Add Motion! The Hohem iSteady M7 Gimbal can help!

The post Add Motion! The Hohem iSteady M7 Gimbal can help! appeared first on Digital Photography School. It was authored by Sime.

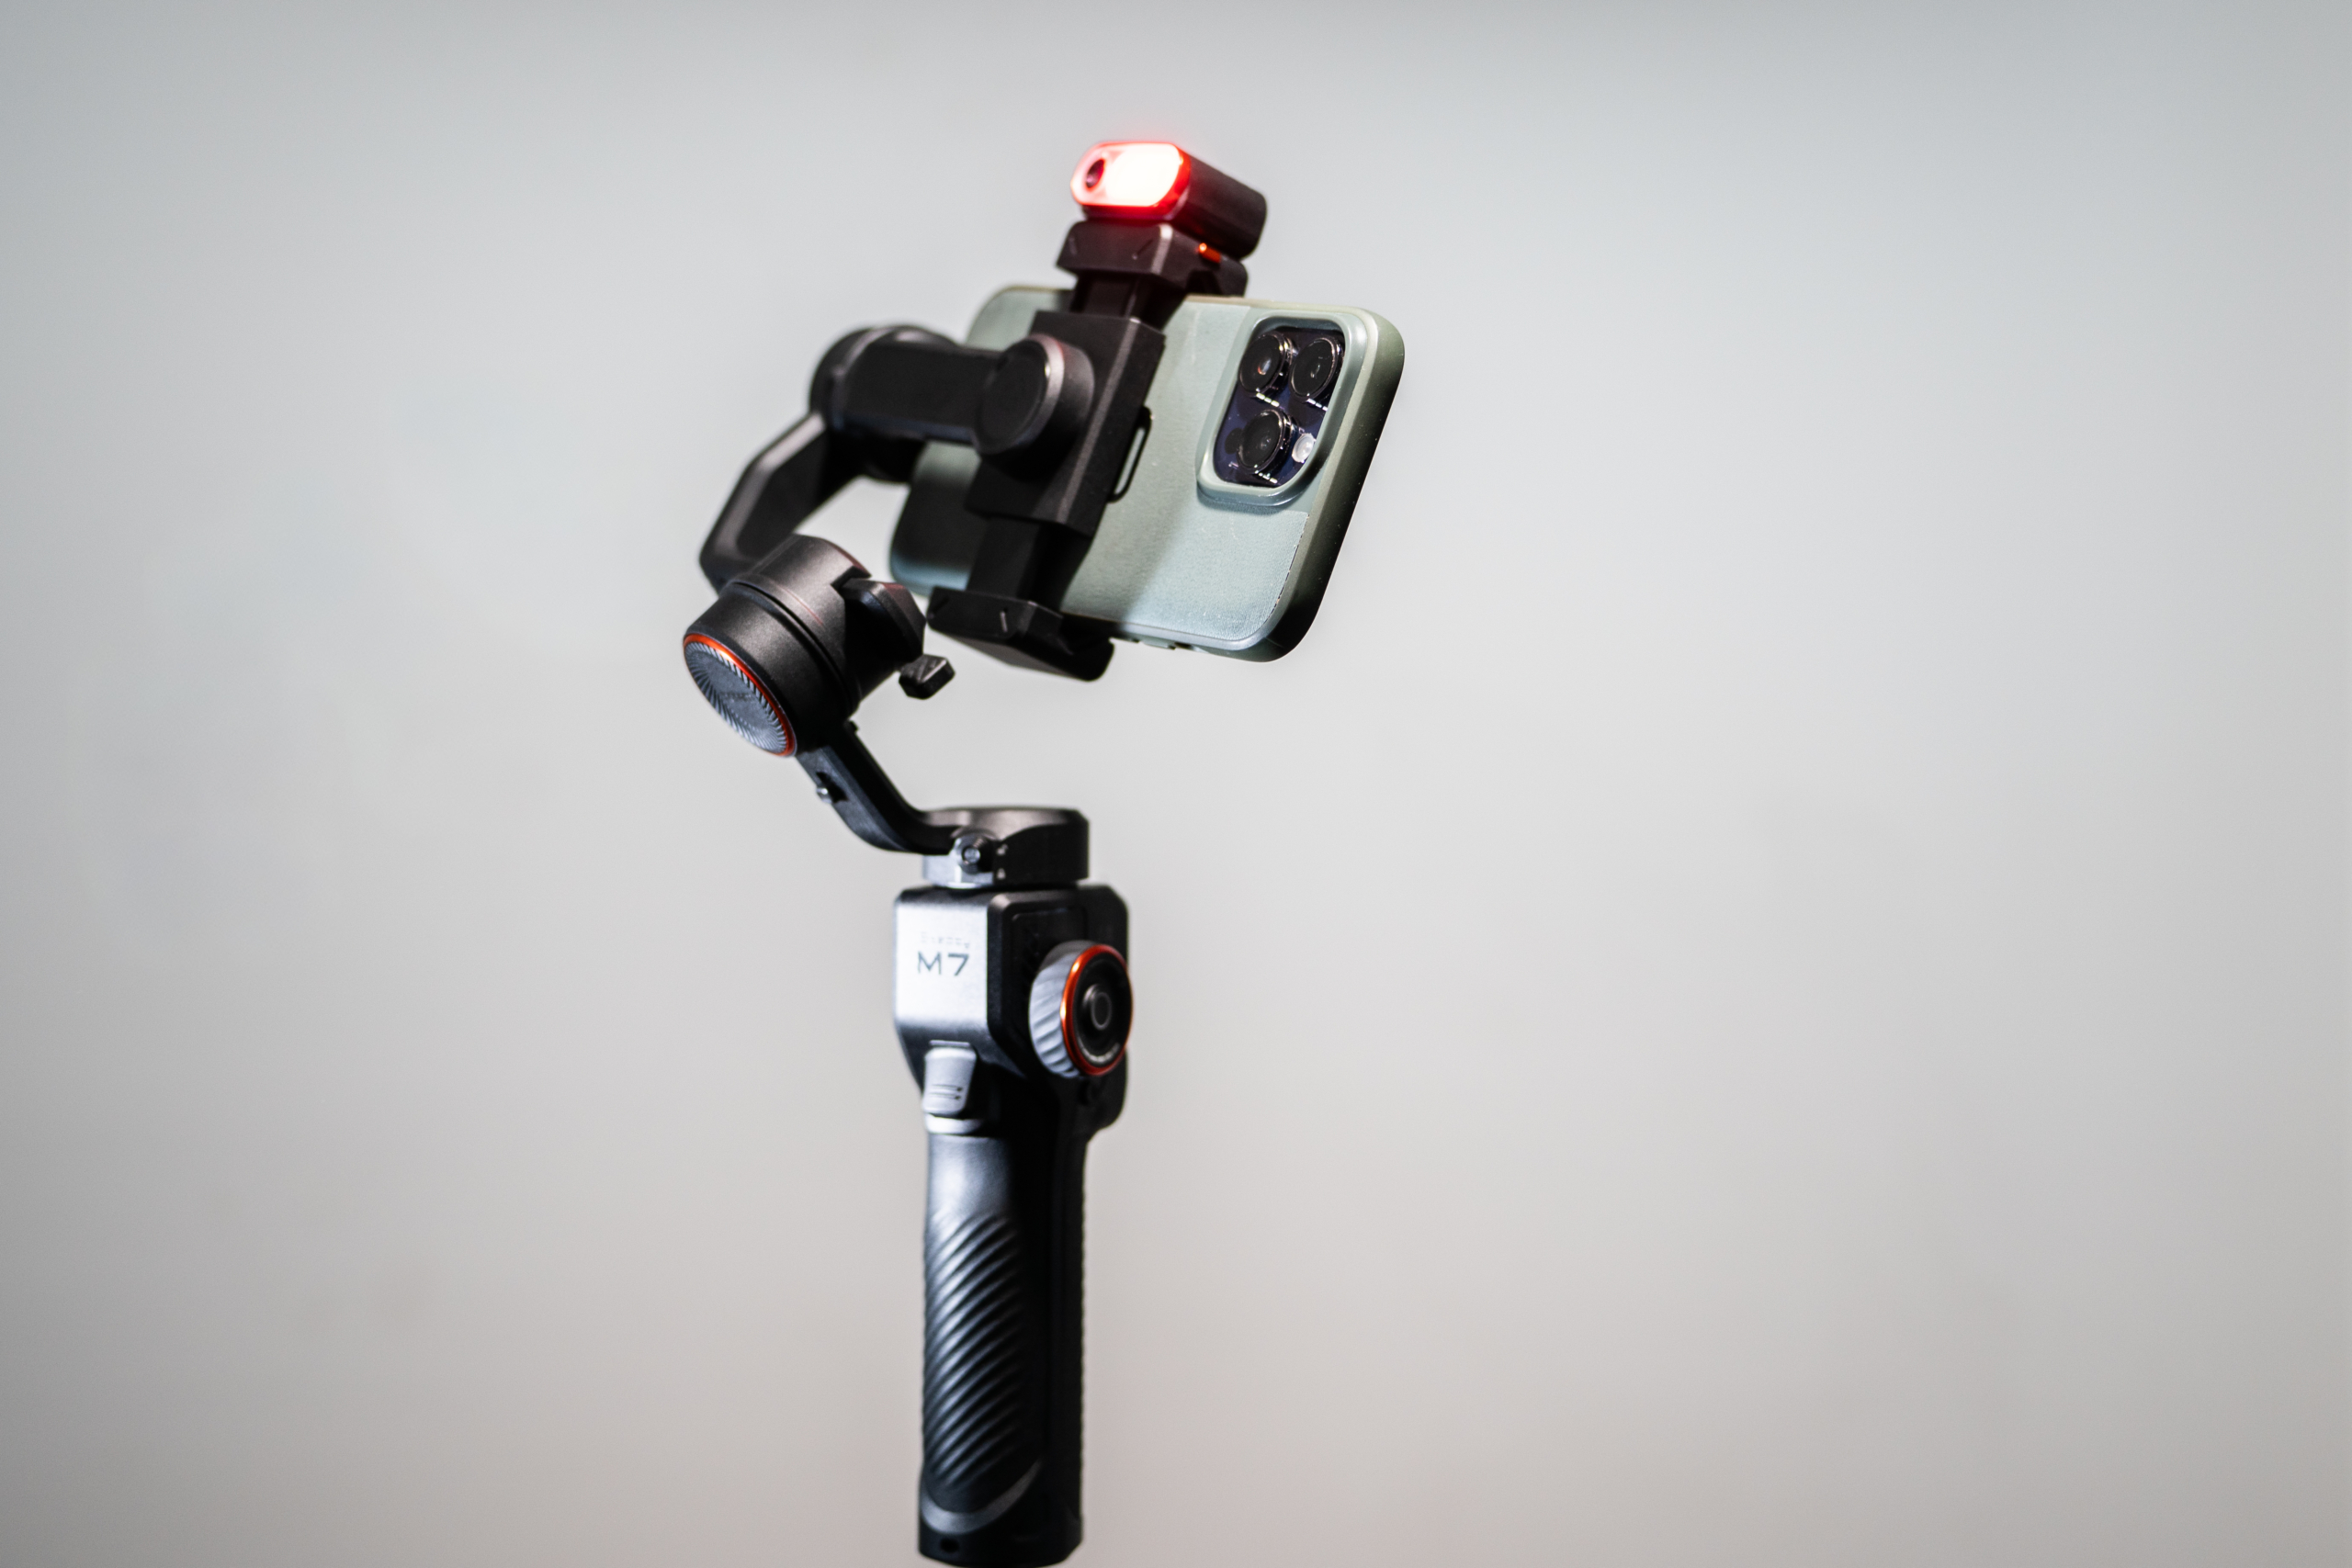
We’ve been sent the latest gimbal from Hohem, the iSteady M7. It’s an ‘Ai Tracking’ gimbal that you can use with your mobile phone to capture video of your work, and after a couple of weeks of using the gimbal for various little projects, here’s what we think! (Tldr; great tool to add to your toolbox!)

Add Motion! The Hohem iSteady M7 Gimbal can help!

When I say ‘video of your work’ I’m specifically talking about that stuff that people seem to love to see in Facebook groups and online in various places, the “BTS” or “Behind The Scenes” from your photo shoots, the footage that people seldom get to experience.

I’ve used all manner of tools to capture behind the scenes of me setting up for a shoot or during a shoot, be it a timelapse of a large group (think team sports) setting up, from when I arrive at the venue to the pressing of the shutter release on the frame that I’m after, to packing away the chairs – I’ve found it’s a nice little extra to share with the team when they get their images for the season! Or another example was when I was photographing a new menu for a client, the experience of setting up the area I was shooting, then the food coming in and out of the set – it was handy for the client (a marketing agency) that they could then use to send to prospective businesses to get more work – There are all kinds of reasons that you might want to maybe catch a bit of video or a cheeky timelapse, and it’s also often the case when you’re starting out that you’re there on your own and don’t have someone to run around capturing that footage…

Well! This is why we thought it might be cool to try out a gimbal like the Hohem iSteady M7, you can use it like a normal gimbal (What’s a gimbal, Simon? : A gimbal is a device that stabilizes a camera or other object, allowing it to remain level and steady despite movement or shaking ) but you can also put it on a tripod and with the Ai follow capabilities, you can have it follow you around your set (It doesn’t walk, no!) and capture that BTS for you, or start a motion timelapse from point A to point B, taking in a whole scene…

The M7 mentions FOLLOW capabilities and Ai in the same sentence, the ability as a solo creator to place your camera phone on the gimbal and have it follow you around the space you’re working in is great! Even with my Pro Max sized iPhone, the gimbal movements were precise and quick, it easily kept track of me – I captured a quick video of the iSteady M7 keeping up with my jerky movements, check this out.

Use-Cases for creating video on your next shoot.

Showcase the creative process – Demonstrates the thought, planning, and techniques that go into a shoot, making the final images more impressive.

Build client trust – Helps potential clients see professionalism, preparation, and problem-solving skills in action.

Create extra marketing content – BTS clips can be repurposed for social media, reels, stories, or blog posts alongside the final images.

Educate and inspire – Provides teaching moments for other photographers or enthusiasts who want to learn from your workflow.

Capture candid, human moments – Shows genuine interactions with clients, models, or crew, which adds relatability and personality to your brand.

Features of the Hohem iSteady M7 Gimbal

  • 360 Degree Infinite Pan Rotation
  • 360 RGB Lighting Colours
  • Detachable 1.4″ LCD Touchscreen controller
  • 500gm Payload
  • Ability to charge / power connected phone
  • Built-in extension pole / selfy stick (it’s about 20cm long)
  • 3 axis stabilisation
  • Live-view via detachable remote

The M7 isn’t the most compact or the most lightweight gimbal you’ll find on the market today, Hohem also have a smaller brother, the iSteady V3 Ultra (Which we’ll also be taking a look at) The M7 weighs in at about 630gm which is actually pretty light! The M7 is never going to fit in your pocket, I found it fit in the laptop sleeve of my new camera bag – small isn’t always better though, the motor strength on the M7 is impressive, easily propels my iPhone 14 Pro Max around like it’s nothing, keeping up with all my shaky handed movement easily ? (I’m a coffee drinker, gimme a break!)

Add Motion! The Hohem iSteady M7 Gimbal can help!

What are our thoughts?

Between the tracking, stabilisation and the live view via the detachable remote, this gimbal is a well-priced option for many of you looking to add a little motion to your photography offerings. You do need to spend a couple of minutes balancing your phone after you put it in the gimbal, but I had no trouble balancing mine, even leaving it in the case was fine. There are MANY controls, but they’re easy to navigate once you get the hang of what they all are, also very easy to install and control the Hohem app if you prefer that. You don’t NEED to install the app, even to use the Ai tracking, you can use it without the app, just using the native camera app on your phone, as the tracking is all done via the little module atop the gimbal – great!

We think this is a great mid-sized gimbal option to use in your creating content, vlogs, making short films with your friends, capturing the holidays or just filming unboxings with a bit of Ai powered dynamic follow-along!

You can check out the Hohem iSteady M7 HERE (There’s a great back to school sale event happening right now)

The post Add Motion! The Hohem iSteady M7 Gimbal can help! appeared first on Digital Photography School. It was authored by Sime.

Review: Espresso Displays 17 Pro 4K display for Photographers and creators!

The post Review: Espresso Displays 17 Pro 4K display for Photographers and creators! appeared first on Digital Photography School. It was authored by Sime.

In the age of portable technology, having a reliable, high-quality external monitor can significantly enhance productivity and creative work. The Espresso Displays ‘espresso 17 Pro’ is a prime example of this! Offering a sleek, high-resolution solution for photography professionals and tech enthusiasts alike. Here’s my review of this beautiful, Australian designed and engineered portable display.

Review: Espresso Displays 17 Pro 4K display for Photographers and creators!
My desk, my coffee – very happy with this setup!

Design and Build Quality

The first thing that struck me about the Espresso Displays 17 Pro 4K display is its design. At just 9mm thin, it is one of the slimmest monitors on the market. The display weighs in at just 1.1kg, so that combined with the ultra-thin profile makes it easily portable, perfect for those who need to travel or work from various locations. The aluminum frame and scratch resistant (level 6) glass not only add to the aesthetic appeal but also ensure durability. (aka my 10yo hasn’t damaged it yet!)

This pro series monitor comes with a super sturdy magnetic stand, aptly named ‘Espresso Stand Pro’ which folds down into a compact travel partner for your display. It allows for easy attachment and detachment, no fiddly lining up, you open the stand and then position your display in front of it and after a decently reassuring thunk, you’re attached and good to go. The stand is pretty much infinitely adjustable, providing multiple viewing angles to suit different needs, whether you’re working, presenting, or watching a video. You can pretty much set the stand from flat to 18 degrees (for drawing) with the handy in-built foot right up to pretty much vertical and everywhere between.

Review: Espresso Displays 17 Pro 4K display for Photographers and creators!
Vertical screen mode – super handy for spreadsheets (or social media management!)

Display Quality

The display measures in at 17.3″ and has a 4k resolution. It can achieve 450 nits brightness, which isn’t as bright as most current day Mac laptops, my 16″ Macbook Pro hovers around 1000 Nits, and honestly I thought this might be a bit of a show-stopper, but in actual real-world use, the displays brightness has been absolutely fine. I’ve used it a variety of environments from my home office to a cafe and for a mixture tasks including photo editing, both in Lightroom and Photoshop, as well as in my 9-5 as a social media manager, having my work and post schedule all spread out on the Espresso Displays 17 Pro 4K wherever I am is a total god-send!

Technical Notes from espresso here:

  • “espresso 17 Pro screen shows 1.07 billion colours, covering 100% of the DCI-P3 colour space”
  • The espresso 17 Pro screen has a resolution of 3840 x 2160, commonly known as 4k. This results in a Pixels Per Inch (PPI) of 257.6. In comparison, the Apple retina display is 227 PPI, and the Apple Pro XDR display is 245.

In short, it’s a stunner!

Performance and Connectivity

This was a big eye opener, it’s so very simple! A single (included) USB-C cable runs your power and signal to the display, you don’t need anything else. Now, you can use an external battery pack if you’re away from power and want to save a little laptop battery power, the Espresso Displays 17 Pro 4K has two USB-C ports, and while you connect your laptop to one, you can connect an external battery to the other to add some external juice. Espresso Displays also have their own ‘Espresso Charge’ external battery, which is a 32,000 mAh gargantuan external battery, it magnets itself perfectly to the Espresso stand and doubles your run time. Note, some airlines may give you a sideways glance when you mention 32,000mAh, so make sure you check before you fly. (I don’t have the battery and wasn’t able to test battery life with it, I’m sorry) Just a note here: It can be taken on flights with carry-on but with permission from the airline. i.e. it’s designed to support as close to a full day of power when combined with a full battery charge on the laptop.

Review: Espresso Displays 17 Pro 4K display for Photographers and creators!
The snazzy purple USB-C cable is included

Portability and Versatility

For my everyday carry, I’m currently using my thinkTank Venturing Observer 20L backpack, its a sleek, no mess, no fuss EDC Backpack and the 17 Pro 4K slots into the laptop section of the backpack with not so much as a MM to spare. I can take the display, my 16″ Macbook Pro as well as the stand, any cables, my pen, headphones, water bottle and a notepad (yes, actual real paper, that stuff is so good – try it haha) with relative ease. The display is lighter than my Macbook Pro, and really hasn’t added any heft to my EDC.

Review: Espresso Displays 17 Pro 4K display for Photographers and creators!
I don’t have a van, but if I did – this is how I’d work!

User Experience and Software

The espresso 17 Pro comes with a couple of pieces of software, notably espressoFlow which is the engine room of screen management if you will, allowing you to manage workspaces, you can use your display as a semi-touchpad, you can rotate the screen and there’s also a great ‘snap’ feature. Oddly, there was one thing I missed when I left the ‘Windows’ computing world, that was the ability to SNAP a screen into a certain place – the espressoFlow software allows you to use a quick set of key combos to shift your active windows from one display to the other, to the left, to the right etc – it’s SUPER handy, even when I’m on my iMac with my traditional second screen, I can use espressoFlow there, and flick windows around my two main screens like I’m dealing cards – it’s a great piece of software!

There’s also JOT, Jot is kinda like a notepad that allows you to draw, as well as implement many various shapes and sizes, think graphs etc. You can draw something, copy and paste it into many various other apps – it’s great for noting stuff down in meetings, kind of like a scribble pade for big kids (But my 10yo also says it’s his favourite thing)

Speaking of Jot, let’s talk about the pen experience for just a minute. The espresso 17 Pro isn’t a replacement for your high end graphics tablet, it’s not coming after your Wacom (in its current form, though I guess they could at some point?) the resolution of the pen isn’t up to scratch with what you can do on a dedicated graphics tablet, but for run and gun edits in photo applications (as opposed to fine detail work) it’s completely fine and really enjoyable to use.

Using the espresso 17 Pro without the pen, with the ‘LiveTouch’ gesture movements and scrolling are silky! Even with my clumsy fingers, the display is very easy to navigate, using similar gestures to those you might be used to using on your Mac.

Battery Life and Power Consumption

One aspect to consider is power consumption. While the monitor does not have an internal battery, it draws power through the USB-C connection. This can impact the battery life of the connected device, especially if you’re using a laptop. However, the power draw is relatively low, and the convenience of a single-cable connection often outweighs this drawback. Keep in mind that for higher brightness levels, you might need to employ that extra external USB-C battery or the espressoCharge.

My Conclusion

The Espresso Displays 17 Pro 4K display is an excellent choice for anyone in need of a portable, high-quality external display. Its sleek design, stunning 4K resolution, and easy connectivity options make it a valuable tool for professionals and creatives. While it may have some minor drawbacks, such as power consumption with prolonged use, the overall performance and portability make it a standout product in the portable monitor market.

Whether you’re a digital nomad, a remote worker, or someone who simply values high-quality displays, the Espresso Displays 17 Pro 4K display is worth considering. It combines form and function in a way that enhances productivity and delivers a superior visual experience.

The post Review: Espresso Displays 17 Pro 4K display for Photographers and creators! appeared first on Digital Photography School. It was authored by Sime.

Introducing the Godox AD400 Pro II Studio Light

The post Introducing the Godox AD400 Pro II Studio Light appeared first on Digital Photography School. It was authored by Sime.

The team at Godox have released the version two of their well loved AD400 Pro series of portable studio lights, or as they like to call them, the All-in-One Outdoor Flash.

Introducing the Godox AD400 Pro II Studio Light

400 Ws & 1/8000 Ws HSS ?

With 400 Ws of output and up to 460 full-power flashes per charge, the AD400ProII delivers sustained, studio-grade performance on location. High-speed sync up to 1/8000 Ws lets you freeze action and balance flash in bright conditions. Whether you’re shooting high-dynamic sports or ultra-short exposures in daylight, every detail comes through with stunning clarity.

Introducing the Godox AD400 Pro II Studio Light

Ultra-Fast Freeze Mode

The AD400ProII can freeze even the quickest motions with an ultra-short flash duration of up to 1/27770 second (t0.1). This lets you capture razor-sharp images of flying water droplets, speeding vehicles, or any fast-moving subject. Coupled with a lightning-fast recycle time (as quick as 0.01 s), the AD400Pro II keeps pace with your creativity without missing a beat.

Introducing the Godox AD400 Pro II Studio Light

1/512 Fine Power Control

AD400 Pro II offers 10 power settings from 1/512 to full power, allowing pinpoint adjustment of flash output for consistent, repeatable exposures.

Introducing the Godox AD400 Pro II Studio Light

30?W Bi-Color Modeling Lamp

The built-in 30?W bi-color LED offers Constant mode for manual brightness (10?%–100?%) and color temperature (2800?K–6000?K), plus Prop mode, where brightness follows flash output. Stable, flicker-free illumination also doubles as a continuous video light.

Introducing the Godox AD400 Pro II Studio Light

2.4?GHz Wireless X System

Equipped with Godox’s 2.4?GHz Wireless X system, the AD400ProII ensures fast and stable multi-light communication. With the X3 trigger, one-tap sync connects all units instantly—no manual group or channel setup needed. It also works seamlessly with Xpro II, X2T, X1, and other X-series transmitters. For expanded triggering options, the USB-C port supports the optional FR433 433?MHz receiver.

Introducing the Godox AD400 Pro II Studio Light

Group Indicator Lights

16 distinct lights assign each group a unique color, so you can identify and adjust any unit at a glance—even in low light or from a distance. Just select the group’s color on screen and tweak power or sync settings instantly, keeping your shoot running smoothly.

Introducing the Godox AD400 Pro II Studio Light

Intuitive Color Display & Controls

Adjust settings instantly using the bright, full-color TFT display, where all key functions are laid out clearly and intuitively. A single press-and-hold of the modeling-lamp button toggles the lamp on or off, putting control at your fingertips and speeding up your workflow.

Introducing the Godox AD400 Pro II Studio Light

Universal Modifier Compatibility

The AD400ProII features both a Godox mount and an included Bowens adapter. Swap between them to use a wider range of modifiers from either ecosystem, unlocking more creative versatility.
*Bowens adapter installs without blocking the Godox mount.

Introducing the Godox AD400 Pro II Studio Light

And much more! You can head over to the Godox website for the full list of features.

Learn more about the Godox AD400ProII on their website here.

The post Introducing the Godox AD400 Pro II Studio Light appeared first on Digital Photography School. It was authored by Sime.

Insta360’s Antigravity A1 8K 360º Drone Takes off!

The post Insta360’s Antigravity A1 8K 360º Drone Takes off! appeared first on Digital Photography School. It was authored by Sime.

A quick press release for those of you that like to take to the skies! (I know I do) but this time, we’re talking about a 360 camera!

The team at Insta360’s new independent drone brand, Antigravity, have unveiled their new drone the Antigravity A1, the world’s first drone with built-in 8K 360 capture. That sounds impressive and like a whole lot of memory card is going to be needed! ?

Key Features

  • 8K 360 capture with top-and-bottom lens configuration.
  • 360 immersive live view and head tracking via the Vision goggles.
  • Invisible drone effect through advanced image stitching.
  • Intuitive point-to-fly controls with the Grip controller.
  • Never miss a shot with easy post-flight reframing and editing.
  • Compact and lightweight at 249g for license-free flying in most countries and regions.
  • Safety features including return-to-home and a payload detection system.

This is also the first product from Antigravity, the new drone brand incubated by Insta360 in collaboration with third parties. A1 combines immersive flight in 360 degrees, an exceptionally accessible flying experience, and limitless creative possibilities.

The Antigravity A1 uses a dual-lens 360° camera to capture its surroundings in every direction. Its advanced stitching technology seamlessly removes the drone from both live view and recorded footage, delivering an immersive, distraction-free experience that puts pilots right inside the scene.

Insta360's Antigravity A1 8K 360º Drone Takes off!

With every angle recorded in ultra-sharp 8K, pilots no longer need to worry about framing shots mid-flight. Instead, they can reframe their footage freely during editing—making flying simpler and reducing the chance of missing key moments. In post, creators can export in any aspect ratio without sacrificing quality and experiment with effects like Tiny Planet or horizon flips. Those familiar with the Insta360 X Series will feel right at home shooting and editing 360° footage with the Antigravity A1.

“The Antigravity A1 is unlike anything we’ve ever brought to market, and it’s poised to transform drone flight in multiple ways,” says Max Richter, Co-Founder and VP of Marketing at Insta360. “It makes immersive drone flying accessible to more people, while giving both hobbyists and professionals a powerful new way to capture and share their stories.”

Insta360's Antigravity A1 8K 360º Drone Takes off!

You can find the full release over on the Insta360 blog, we hope to get hold of one to test for you dPS drone pilots!

The post Insta360’s Antigravity A1 8K 360º Drone Takes off! appeared first on Digital Photography School. It was authored by Sime.