Wide-Angle Lenses: Everything You Need to Know (+ Tips)

The post Wide-Angle Lenses: Everything You Need to Know (+ Tips) appeared first on Digital Photography School. It was authored by Andrew S. Gibson.

wide-angle lenses: everything you need to know

Plenty of photographers love wide-angle lenses, and for good reason: Wide-angle lenses can capture breathtaking landscapes, stunning environmental portraiture, jaw-dropping architecture, and so much more.

But what exactly is a wide-angle lens? And how can you create amazing wide-angle photography?

In this guide, I explain everything you need to know about working with wide-angle glass. I offer basic definitions, and I also share my favorite tips for wide-angle images – so that, by the time you’re finished reading, you’ll be ready to capture pro-level results.

Let’s dive right in!

What is a wide-angle lens?

A wide-angle lens provides an image that’s wider than what you can see with your eyes. Wide-angle focal lengths sit in the 8mm to 45mm range.

Wide-angle lens photography

Because of the wide-angle field of view, when you look through a wide-angle lens, you’ll encounter an expansive scene. For instance, if you’re standing on a beach at sunset, a wide-angle lens will show you the setting sun, but it’ll also show you the rocks at your feet and the clouds high in the sky:

wide-angle lens photography

Note that the smaller the focal length (i.e., the lower the focal length millimeter number), the wider the lens and the more expansive the view. A 35mm lens is slightly wide, a 24mm lens is moderately wide, and a 10mm lens is insanely wide.

Most manufacturers sell many of the same wide-angle focal lengths. Here are a few common options:

  • 12-24mm
  • 24-70mm (here, the 70mm end starts to stretch into telephoto lens territory)
  • 16-35mm
  • 24mm
  • 18-55mm
  • 35mm

Wide-angle vs telephoto lenses

If you’ve spent some time browsing lenses, you’ve probably come across the terms “wide-angle” and “telephoto.” These are two ends of the spectrum in photography lenses.

As I explained above, wide-angle lenses offer you a broader field of view, extending the frame beyond what the human eye naturally sees; telephoto lenses, on the other hand, allow you to zoom in when photographing distant subjects.

Wide-angle lens photography
A telephoto lens in action! Telephoto lenses tend to be much longer and heavier than wide-angle lenses.

Telephotos are ideal for capturing small birds and planes high above, and they can also be great for zooming in on specific parts of a landscape.

Wide-angle lens photography
A close-up bird photo like this one requires a long telephoto lens.

But while telephoto lenses are perfect for smaller and more skittish subjects, they have serious limitations. They’re large, bulky, and very expensive, plus they’re not designed for expansive shots that include both the subject and its environment – so a tele lens will not help if you’re aiming to capture an entire seascape.

This is where wide-angle lenses have the upper hand. They allow you to capture more of the scene, making them perfect for grand vistas and wide-open spaces. So if you’re looking to go broader, not tighter, a wide-angle lens is the right buy.

Reasons to try wide-angle photography

Wide-angle lenses offer a few key benefits. First, as I emphasized above, the wider your lens, the greater the scene that you’re capable of capturing.

So if you want to capture beautiful, sweeping landscape shots that include the foreground and the background and a beautiful sky, a wide-angle lens is essential. Standard and telephoto lenses will only capture a small slice of the scene, while a wide-angle lens will show it all.

wide-angle lens photography

Second, wide-angle lenses help you create shots that have a deep depth of field – that is, shots that are sharp from foreground to background.

wide-angle lens photography

The closer you are to your subject and the longer the focal length you use, the more blurred the background will appear. Wide-angle lenses, however, use short focal lengths, which means that your main subject will turn out sharp, as will key elements in both the foreground and the background. This deep-depth-of-field look is heavily favored by landscape and architectural photographers (and can look great in portrait and street shots, too!).

Third, wide-angle lenses help exaggerate perspective. When you capture a sunset scene at, say, 16mm, the sand and water in the foreground will look unusually close to the lens, while the horizon line will look unusually far from the lens.

Take a look at this next shot; notice how the stones look huge in comparison to the background buildings?

wide-angle lens photography

While this type of perspective distortion isn’t always desirable, you can use it to emphasize foreground elements and create images with lots of depth. (For those reasons, the effect is used by landscape photographers all the time!)

Wide-angle zooms vs primes

Wide-angle lenses can grouped into two categories: fixed focal length lenses, known as primes, only capture a single field of view, while multi-focal length lenses, commonly referred to as zooms, allow you to zoom in and out as required.

If you’re trying to pick a good wide-angle model but you’re not sure which lens type to choose, consider your goals and preferences.

Prime lenses are usually more affordable, so if money is tight, a prime might be your best bet. Additionally, they are compact and light, making them ideal for travelers or those who are constantly on the move. Finally, if you love creating shallow depth of field effects, a prime lens is often the better choice, given that they tend to feature wider maximum apertures than zooms.

Wide-angle lens photography
Prime lenses tend to be small and light.

Zoom lenses, however, win in the flexibility department. Imagine going out for a day of shooting a variety of subjects: forests, beaches, street photography, portraits. With a zoom lens, you can capture it all without swapping out your gear. Convenience is the key advantage here, though you can save money in the long run because you’ll need fewer lenses to build out your wide-angle kit.

But zooms are bigger and heavier than primes, plus if you want a zoom lens with a wide maximum aperture, you’ll often pay a pretty penny. And the optics rarely measure up to prime lenses, especially not those in a similar price category.

Wide-angle lens photography
Zoom lenses are bigger and more expensive than primes, but they certainly offer a lot of flexibility!

At the end of the day, both lens types are perfectly valid options, and there’s no right choice; it all depends on your preferences and requirements!

When should you use a wide-angle lens?

Wide-angle lens photography

Certain situations pretty much always make for great wide-angle photography. Landscape photographers use wide-angle glass almost exclusively, as do many architectural, street, and cityscape photographers. Here’s a more detailed list of the images you can capture with a wide-angle lens:

wide-angle lens photography

On the other hand, if you want to create tighter, intimate shots of a single subject, wide-angle lenses are generally best avoided. Here are images that are not easily captured with wide-angle glass:

  • Headshots
  • Half-body portraits
  • Sports players in action
  • Wildlife portraits
  • Bird portraits
  • Architectural detail shots
  • Distant landscape detail shots

Of course, these lists aren’t exhaustive, and they’re not set in stone, either. Wildlife photographers do occasionally use wide-angle lenses to capture animal portraits, for instance – it just takes a lot of planning (and generally involves remote-controlled cameras and/or blinds). On the other hand, street photographers do occasionally use telephoto lenses to shoot wider scenes, but it requires a lot of distance (and can’t easily be done in congested, tightly packed areas).

So while you can use this section to guide your photography (and to decide whether a wide-angle lens is right for you), don’t let it restrict you. In fact, some of the best images are taken by going against the grain!

How to use a wide-angle lens: 7 quick tips

Wide-angle lenses are great, but it’s not always easy to get stunning wide shots. In this section, I offer my best tips, tricks, and techniques for working with wide-angle lenses, starting with:

1. Combine your subject and environment

Wide-angle lens photography

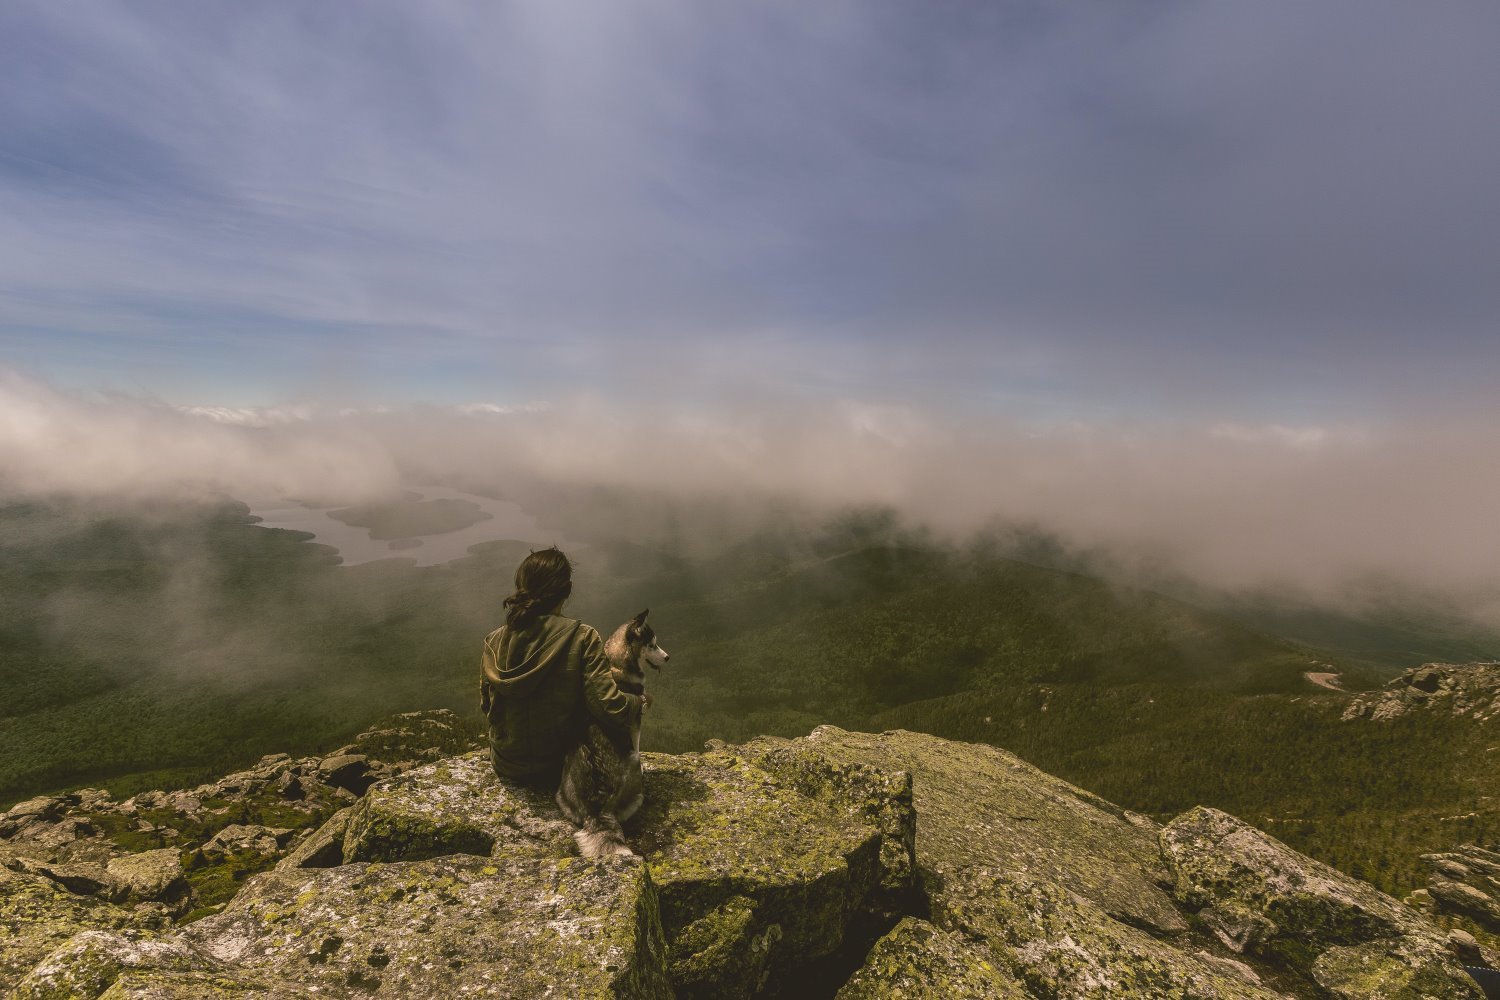
A common mistake in wide-angle photography is losing sight of the big picture. It’s easy to get excessively focused on your main subject, so I recommend that you regularly remind yourself that wide-angle lenses allow you to capture a broader scene.

In other words, you don’t have to just set your frame around the main subject; you can have plenty of fun combining both the subject and its surroundings! As you shoot, pay attention to the background and other elements in your scene. Think about how you might incorporate it into your shots, and consider taking a few steps back to really emphasize the wider world.

Of course, you shouldn’t go overboard. More isn’t always better, especially because background elements can be distracting. The last thing you want is a distracting sign or stoplight taking focus away from a portrait subject! So if you do try to create more environmental images, look to enhance the overall composition without adding unnecessarily eye-catching elements.

2. Include foreground interest for added depth

Foreground interest refers to eye-catching elements in the foreground of your image – and if you can include a bit of foreground interest in your composition, it’ll look amazing. It’ll also add lots of depth, which can be a great way to make your wide-angle shots stand out.

Landscape photographers use this technique all the time. They’ll photograph a distant mountain, but they’ll add a river, a road, some flowers, or a fallen log in the foreground; that way, the viewer’s eye starts at the bottom of the frame, then slowly journeys through the scene toward the mountain in the background.

wide-angle lens photography

Of course, you can also use foreground interest to enhance urban landscapes, street scenes, and so much more. The sky is the limit!

So as you set up your shot, keep an eye out for these elements. Adjust your composition to include them. Try to create a journey for the viewer – so they can start in the foreground and naturally move toward the background of the scene!

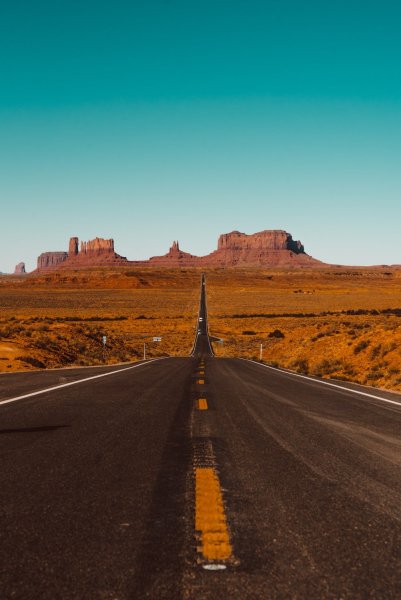
3. Add leading lines

Leading lines refer to lines that lead the eye through the frame, and they’re a great way to give your photos three-dimensionality.

Leading lines generally start toward the bottom of the frame – as foreground interest – then work their way up (and back), so that they push the viewer toward the main subject.

wide-angle lens photography

That said, you can really position leading lines anywhere throughout the frame; for instance, an outstretched arm can lead the eye toward a car (in a street photo), or a fallen pear can lead the eye toward a basket of fruit (in a still life photo).

So train yourself to look for lines. And then, when you find a line or two, use it to guide the viewer through the frame!

4. Watch the depth of field

Wide-angle lens photography

It’s easy to assume that everything will be in focus with a wide-angle lens. But while wide-angle glass does make it easier to maintain sharpness, depth of field still matters.

Your aperture setting and focus point play a crucial role here, especially when your composition includes elements close to the lens (see my tip on including foreground interest, above!). To ensure most or all of your scene is in focus, make sure you dial in a smaller aperture, such as f/8 and beyond.

Wide-angle lens photography

Additionally, set your point of focus about a third of the way into the scene. This technique allows you to approximate the hyperfocal distance, which is basically a fancy way of saying that it maximizes your window of sharpness!

5. Don’t be afraid to go minimalist

wide-angle lens photography

Minimalistic photography features lots of negative (i.e., empty) space, such as broad expanses of sky, long stretches of untouched beach, plain white walls, and so on. The negative space occupies most of the composition, while a small portion of the image features an eye-catching subject (such as a person walking in the distance).

And wide-angle lenses are great for producing stunning minimalistic photos.

You see, the wide field of view will help you stuff your photos full of negative space. Simply find a subject, position yourself so the subject is surrounded by empty space, then zoom out to your widest focal length. The results will be gorgeous!

6. Get up close for added distortion

Wide-angle lens photography

Most photographers try to avoid distortion in order to capture natural-looking images that closely mirror reality. But as I mentioned above, distortion isn’t always bad – and if you really lean into those distortion effects, you can produce some unique and creative shots.

Here is the basic rule of perspective distortion: The closer you get to your subject, the more you can exaggerate proportions, making nearby objects appear larger while pushing away the background. So if you put your lens close to a person’s face, their nose and lips will become large while the area behind them will seem to recede.

Of course, ultra-wide lenses may not be your first choice for a flattering portrait, but that’s not what we’re after here. The goal is to create disorienting, almost surreal scenes. Landscapes with a towering flower in the foreground or a pet’s face humorously exaggerated can spark intrigue. You can even use this technique for architectural photography, where the distortion can emphasize the intense lines of a building.

So the next time you’re out shooting, challenge the norms. Try positioning yourself close to your subject with your wide-angle lens. It’s a simple way to create stunning, unconventional images!

7. Correct perspective issues in post-processing

Wide-angle lens photography

While distortion can be a creative tool, there certainly are times you’ll want to minimize it. When you’re photographing architecture, for instance – either interiors or exteriors – a wide-angle perspective will frequently result in converging verticals. And when shooting landscapes with trees, you may sometimes notice the trunks “leaning” to one side.

The bad news is that, in both of the above cases, the distortion can look somewhat amateurish. The good news is that correcting such issues is a straightforward process in most post-processing software. Lightroom, for instance, offers a “Transform” panel where a single click can remove perspective distortion, and you can even purchase dedicated programs that are designed specifically to handle perspective issues.

Bottom line: Before you publish or share a wide-angle image, make sure you look it over for any unwanted perspective distortion! While distortion isn’t always bad, it’s important that you use it deliberately, not accidentally.

Wide-angle lenses: final words

wide-angle lens photography

Wide-angle photography is certainly a lot of fun – and you can use wide-angle glass to capture gorgeous landscapes, portraits, and so much more.

Hopefully, you found this article useful, and I do encourage you to save some (or all!) of the tips I shared. That said, don’t follow them too carefully; photography is all about finding what works for you and adapting old approaches to fit your unique style.

So pick the perfect wide-angle lens. Start practicing. And have fun!

Now over to you:

What kind of wide-angle lens do you plan to buy? What kind of wide-angle photography do you want to do? Share your thoughts in the comments below!

The post Wide-Angle Lenses: Everything You Need to Know (+ Tips) appeared first on Digital Photography School. It was authored by Andrew S. Gibson.

Hohem iSteady V3 Ultra Review: A Compact Gimbal That Punches Above Its Weight

The post Hohem iSteady V3 Ultra Review: A Compact Gimbal That Punches Above Its Weight appeared first on Digital Photography School. It was authored by Sime.

The i7 was great! How does the more compact V3 Ultra stack up?

A little while back we reviewed the Hohem iSteady i7, a larger, feature-packed gimbal that impressed us with its stability and creative shooting modes. After publishing that review, we heard from a handful of readers asking: “What about the smaller one — the Hohem iSteady V3 Ultra?” I guess that’s a fair question if you’re carrying your camera gear, you want a gimbal that’s small and handy! This one sure is small and handy. Easily slotting into most any camera bag or a pocket in a pinch.

Hohem iSteady V3 Ultra Review: A Compact Gimbal That Punches Above Its Weight

So yes, we got our hands on the V3 Ultra to see how it stacks up. Spoiler alert: if you’ve been looking for a compact, travel-friendly gimbal that doesn’t cut corners, you’ll be pleasantly surprised.


First Impressions

Straight out of the box, the V3 Ultra feels solid but lightweight. At just over 350g, it’s noticeably lighter than its bigger sibling, making it the kind of gear you can throw in a daypack without thinking twice. For travel, vlogging, or family adventures, that’s a huge plus.

The foldable design also makes it a natural choice for creators who don’t want their kit to take up half the carry-on space.


Setup and Ease of Use

One of Hohem’s strong points has always been user-friendly setup, and the V3 Ultra is no exception. Balancing takes seconds, and once you pair it with the Hohem Joy app, you get access to a suite of features like:

  • AI gesture control for hands-free shooting
  • Face tracking that keeps subjects in frame (great for solo shooting)
  • A variety of creative shooting modes like hyperlapse, timelapse, and dolly zoom
  • Detachable, adjustable (output and colour temp!) LED fill light
  • Detachable 1.22″ full-colour touchscreen remote (Works up to 30′ away)

It’s the same experience we liked on the i7 — just in a smaller package.

The Ai tracking (And as you know, I’ve mentioned before about my feelings on Ai haha) …the tracking is easily as good in my experience! Especially good for such a compact gimbal! The gesture control was concise ??

The Hohem iSteady V3 Ultra supports 360 degrees infinite pan tracking, so yes, you can literally run circles around your camera! Another example might be working on a workbench, moving around it to different tools, your camera setup in the middle, or you’re on set, shooting menu items and the Hohem iSteady V3 Ultra will stand in the middle allowing you to work all the way around the room while the camera follows you.


Performance and Stability

This is where many “compact” gimbals fall short, but the V3 Ultra holds its own. Whether walking through a busy street or chasing kids around the park, footage stayed buttery smooth and professional-looking.

The 3-axis stabilisation is reliable, and the motors feel confident even with slightly heavier phones. If you’re using something like an iPhone 14 Pro Max (Like mine, below) or a large Android, the gimbal still manages just fine.

Hohem iSteady V3 Ultra Review: A Compact Gimbal That Punches Above Its Weight

Interestingly, the photo above (With the little tripod that was already on my desk!) was before I realised the iSteady V3 Ultra already has a built in tripod, I didn’t realise because it was tucked tightly out of the way! Another super-convenient point on the board! ?

Hohem iSteady V3 Ultra Review: A Compact Gimbal That Punches Above Its Weight

Battery Life

Hohem claims up to 9 hours of battery life (or 4 in Ai mode), and in our testing I’d say you would likely get pretty close to those times. For a day of filming, you’re unlikely to run flat unless you’re really pushing it. Charging is quick via USB-C, another tick in the “modern and convenient” box.


Who’s It For?

If you already own the iSteady i7 and love it, the V3 Ultra isn’t trying to replace it — it’s more like its nimble younger sibling. The i7 is perfect when you want maximum stability and creative control, while the V3 Ultra is what you’ll reach for when you’re packing light.

  • Travelers will appreciate the compact size.
  • Vloggers and solo creators will love the gesture control and tracking.
  • Parents and casual shooters will enjoy smooth video without needing pro-level gear.

Final Thoughts

The Hohem iSteady V3 Ultra is a reminder that small doesn’t mean limited. It delivers stability, creative shooting modes, and ease of use in a size that’s perfect for everyday carry.

If the iSteady i7 is your go-to for serious shoots, the V3 Ultra is the one you’ll happily bring everywhere else.

You can check it out here on Hohem’s website.

Buy well, buy once — and in this case, the smaller sibling might just be the one you’ll reach for more often ?????

The post Hohem iSteady V3 Ultra Review: A Compact Gimbal That Punches Above Its Weight appeared first on Digital Photography School. It was authored by Sime.

Essential Night Photography Equipment: A Quick Guide

The post Essential Night Photography Equipment: A Quick Guide appeared first on Digital Photography School. It was authored by Christian Hoiberg.

Key night landscape photography gear

Looking back at this article, we suggest a full frame camera, and honestly, it likely is the best tool for the job, but, there’s no reason you can’t use ANY camera you have to try a bit of night sky photography, even most modern phones will allow you a slower shutter and higher ISO to capture ‘something’ – Key is keeping that camera, whatever camera it is, nice and still. The new iPhone, your Samsung Galaxy (Come on, it’s got GALAXY in the name!) …I’ve been using the phone holder from 3Leggedthing, but there are MANY out there… (Benefits I guess are that the 3LT one has an arca swiss base that allows you to put it straight on your tripod) ….so don’t let the whole full-frame thing hold you back, get out there and experiment! — Updated by me, 15 Sept, 2025. — Simon ??

Night landscape photography is a demanding genre; you can’t just head out with a handheld camera and expect to come back with gorgeous shots. To get the best results – the kind that you can print large and hang on your wall – you need the right gear.

One way to determine essential gear for nighttime landscapes is through trial and error, but it’ll take a long time (and a lot of money) to arrive at the best setup. That’s where I can help; as an experienced landscape shooter, I can offer plenty of advice for selecting the perfect gear. And below, I share my favorite night landscape photography equipment, including the best cameras and lenses as well as key accessories such as tripods and filters.

Let’s dive right in.

1. A full-frame camera

Night landscape photography equipment

Your camera is your most crucial tool for night landscape photography, and purchasing a capable model is essential.

You see, in the world of nightscapes, a high-quality landscape camera – especially a full-frame camera – makes all the difference. These models excel at high ISO settings, which are crucial for capturing the night sky above dimly lit terrain. And while you can get by with entry-level APS-C models, you’ll quickly notice limitations. Noise will start to creep in, and your starry sky will look more like a grainy mess.

Night landscape photography equipment

Now, the DSLR versus mirrorless debate does come into play here. Mirrorless models are feature-rich, and features like manual focusing guides and electronic viewfinders come in handy in certain scenarios. But don’t discount DSLRs; their optical viewfinders are very effective when working in near-total darkness. Ultimately, both have their merits, and it comes down to what you’re most comfortable using. Just remember that it’s crucial to go full-frame for the best high-ISO performance.

2. A wide-angle lens

Night landscape photography equipment

Lenses are the eyes of your camera, and in the domain of nighttime landscapes, you’ll want those eyes to be wide open. Typically, wide and ultra-wide lenses are your best bet for capturing the grandeur of the night sky with plenty of interesting foreground. A lens like a 14-24mm zoom will include more of the scene for awe-inducing compositions, though such lenses do generally come with a hefty price tag.

Night landscape photography equipment

If your budget is tight, don’t count yourself out. You can go for a 17-40mm zoom or even a 24mm prime lens, both of which will offer reasonably wide fields of view.

One final tip: Keep an eye out for lenses with large maximum apertures, like f/2.8. A large aperture is your best friend in low-light situations; it allows more light to hit the sensor, resulting in vibrant, crisp shots with stars that look sharp.

3. A sturdy tripod

Night landscape photography equipment

If you’ve dabbled in any kind of landscape photography and you don’t already own a solid tripod, I highly recommend you purchase one right away. This is especially true if you want to photograph at night – shooting at night usually means using slower shutter speeds to let in more light, and without a tripod, you risk capturing blurry photos.

In other words, a good tripod will make a world of difference in your night landscapes.

Night landscape photography equipment

Carbon fiber tripods are generally the way to go. They’re lightweight and tend to be extremely sturdy, though they can be pricey. Don’t feel you need to purchase the best of the best, as a middle-of-the-road, solid tripod won’t break the bank and can still deliver dependable results.

On the other hand, resist the urge to snag a budget tripod. They may seem cost-effective, but they often break and won’t always net you sharp images, which will cost more in the long run.

4. A remote shutter release

Night landscape photography equipment

So you’ve set up your camera perfectly, dialed in the settings, and you’re ready for the shot. You press the shutter button, expecting to capture a great image – but when you review the shot, it looks blurry. Why? Because your camera moved when you touched it.

That’s where a remote shutter release comes into play. This nifty gadget allows you to take photos without touching your camera, eliminating any chance of camera shake so you can capture tack-sharp shots time and time again.

If you’re keen on star trails or long exposures beyond 30 seconds, it’s important to recognize that some advanced remotes display the exposure time; that way, you can carefully determine the length of the exposure as you work.

But what if you don’t plan to use extra-long shutter speeds? Using your camera’s built-in two-second timer can also prevent vibrations from pressing the shutter, but it’s not the most convenient way to shoot, and you might find a remote release to be a valuable addition to your gear bag.

4. A natural night filter

Night landscape photography equipment

Photographers don’t talk much about using a natural night filter, but let me tell you, this tool can be a game-changer. Especially when shooting near cities or populated areas where light pollution is a big issue, a natural night filter becomes a go-to item in my kit. It slots easily into a filter holder on the front of your lens, and once in place, it acts as a barrier, filtering out the wavelengths of light pollution that mess up your photos.

Sure, you can try to fix light pollution issues in post-production. But in my experience, the right filter can save you a lot of hassle – your images will come out crisper and more balanced right off the bat. NiSi and LEE are great brands for night filters, and they both offer robust and effective options. The filters aren’t exactly budget-friendly, but if you’re serious about capturing the night sky in all its glory, investing in one can be worth every penny.

5. Plenty of batteries

Night landscape photography equipment

It’s every photographer’s nightmare: You get all geared up, find the perfect spot, set up your tripod, take a few shots, and then – oh no! – the battery dies. Long exposures and cold nighttime temperatures can deplete your batteries faster than you think, and that’s why having extra batteries is non-negotiable when you’re out in the field at night.

In a perfect world, we’d all carry a handful of brand-name batteries from Canon, Nikon, or Sony. But let’s face it, extra batteries are expensive – so if you’re looking to save a bit, there are third-party batteries that cost less. Just read the reviews, and understand that they might not have the same longevity or reliability as the name-brand ones.

Night landscape photography equipment

You can also adopt a few tricks to save battery life. Turn on your camera’s power-saving mode, avoid using the electronic viewfinder, and only power up your camera when you’re ready to shoot.

But my basic advice? Keep two or three fully charged batteries in an inner pocket of your jacket, especially if it’s cold. That way, you’re always prepared, and you won’t have to cut your photography session short because of a dead battery.

6. A powerful headlamp

Night landscape photography equipment

Shooting at night is, well, dark. You’re out in the field with a bag full of equipment, but none of it will be useful if you can’t see what you’re doing.

A handheld flashlight might come to mind as a solution. However, using one can be limiting. If you’re maneuvering over uneven ground, your hands are better off free, and that’s where a headlamp becomes invaluable. Strap it on, and suddenly you have light exactly where you’re looking, no juggling act required.

Plus, with a headlamp, you can see clearly as you mount your camera, select focus, adjust composition, or change settings. But don’t forget to turn off the headlamp before you hit the shutter. Otherwise, you’ll end up unintentionally painting your scene with light.

7. A smartphone

Night landscape photography equipment

Your smartphone is a lot more than just a device for calls and texts; when you’re out capturing the beauty of the night, it becomes an incredibly useful tool.

First off, your phone can help you navigate. GPS and mapping apps can guide you to the perfect location for your shoot. It’s crucial to be able to find your way, especially when you’re shooting in remote areas.

Plus, in the unfortunate event you find yourself in a tight spot, your phone is your lifeline. Of course, make sure you’re within a signal range if you’re relying on it for emergencies.

Finally, your phone can be an all-in-one photography assistant. There are various apps available that can enhance your nighttime photography game. I’m talking about depth-of-field calculators and apps that show you the position of the sun, the moon, and the stars. Whether you’re planning your next outing or adjusting your settings on the fly, these tools can be invaluable.

Night landscape photography gear: final words

Night landscape photography equipment

And there you have it: my go-to list for nighttime landscape photography equipment. From powerful full-frame cameras and wide-angle lenses to sturdy tripods and remote releases, each piece of gear plays a crucial role.

But it doesn’t end there. The more nuanced pieces of equipment like natural night filters, headlamps, and even your smartphone can make the difference between a good photograph and an extraordinary one!

You’re now ready to head out and capture the magnificence of the night sky. So pack your gear, and don’t forget the spare batteries. The night is waiting, and so are countless opportunities to take truly awe-inspiring photographs!

Now over to you:

What equipment do you plan to purchase for your night landscape photo kit? Share your thoughts in the comments below!

The post Essential Night Photography Equipment: A Quick Guide appeared first on Digital Photography School. It was authored by Christian Hoiberg.

3 Legged Thing Unveils Axis Strap System on Kickstarter

The post 3 Legged Thing Unveils Axis Strap System on Kickstarter appeared first on Digital Photography School. It was authored by Sime.

Camera Straps Just Grew Up (Again!)

If you’ve ever wrestled with a camera strap that digs into your shoulder, twists at the worst moment, or just feels like it was designed for someone else’s body, 3 Legged Thing’s new Axis Strap System promises a rethink.

It’s a home-grown British solution built for real photographers, available now on Kickstarter! Take a look at the Kickstarter Here

3 Legged Thing Unveils Axis Strap System on Kickstarter

We’ve had the Axis Sling and the Axis 34 for a little over a week now, and they’ve already been put through their paces. I shot two halves of a soccer match and then wrangled a team portrait for 32 people (an annual tradition that’s always a lot of fun!).

During the game, I ran the Axis Sling with my Sony a7Rmk3 and Tamron 150-500mm, The sling’s QD attached to a QD plate on my lens’ foot. When it came time to line everyone up for the big team photo, I switched out to the Axis 34. Worn cross-body with the camera off to one side, Easily adjusting the strap up tighter to my body with the handy ‘easy-pull lever’ made moving around much easier. The QD buckle attachment feels so solid, I was confident it wasn’t going anywhere from that first click. Kicking goals!

Check out the Kickstarter for 3LeggedThing’s New Axis Strap Series Here

3 Legged Thing Unveils Axis Strap System on Kickstarter

What really stands out for me is being able to swap where the strap connects. With the rock-solid QD buckle, I can clip straight into my L-bracket or a QD Arca Swiss compatible quick release plate — a true gamechanger. It’s a word that gets thrown around a lot, but this time I feel like it genuinely applies.

3 Legged Thing Unveils Axis Strap System on Kickstarter

Using the Arnie dedicated QD L-bracket on my camera and a QD arca swiss plate on the foot of my lens, I could use either connection points and have my camera hang at my side pretty much however I wanted, making it very easy to grab my camera and bring it up for a photo.

The Axis 34 has gained a regular slot in my camera bag – as someone who has used pretty much every style of camera strap available, I think the new Axis range from 3 Legged Thing is about as close to perfect, for me, as it gets.

3 Legged Thing Unveils Axis Strap System on Kickstarter
Ain’t no model!?

Here’s what they say

British camera-support manufacturer 3 Legged Thing is bringing its trademark innovation and engineering expertise to the world of carry solutions with the launch of the Axis Strap System, debuting today on Kickstarter.

3 Legged Thing Unveils Axis Strap System on Kickstarter

At the heart of Axis are two game-changing components: the beautifully unique 4-Axis QD Buckle and 3LT’s own take on an essential piece of hardware — the QD Swivel. Originally developed for astronautics, military and law-enforcement gear — even trusted by NASA for tethering cargo — this ultra-secure quick-detach system has been re-engineered by 3 Legged Thing to keep cameras safe, accessible and ready for action.

3 Legged Thing Unveils Axis Strap System on Kickstarter

We designed the world’s first four-axis QD buckle — which means you can actually adjust how your strap fits and moves. All body shapes are different, so why should photographers settle for anything less than a tailored fit? Switch which socket you plug into to seamlessly contour the strap around your natural curves. Got a six-pack? Good for you. Working on a keg? Time to celebrate. Muffin top? We’ll make it fit. Moobs? Now you can style it out. ?


Made in Great Britain – Creating Local Jobs

Axis straps are proudly designed, engineered and manufactured in Great Britain, meeting one of the world’s most respected engineering standards. To support this launch, 3 Legged Thing has invested in a new UK-based sewing facility, creating local jobs and ensuring the entire range is built to the highest standards of craftsmanship. For photographers, that means world-class design, built in the shires of middle England, with a distinctly British stamp of quality.


A Strap System Like No Other

The Axis range covers every style of carry:

  • Axis Pulse – a compact, rock-solid wrist strap
  • Axis 24 / 34 / 44 – sleek, supportive straps in three widths to match any camera, from small mirrorless to heavy pro rigs
  • Axis Sling & Twin Sling – breathable cross-body comfort, with a dual-camera option that converts back to a single in seconds
  • Axis Anywhere & Gatekeeper – clever bag-mounting solutions that take the weight off your neck and shoulders
  • QD4 & QD7 Plates – Arca-Swiss compatible quick-release plates with integrated QD sockets, built for seamless connection
3 Legged Thing Unveils Axis Strap System on Kickstarter
3LeggedThing Axis Kickstarter

Engineering Meets Comfort

Axis isn’t just about the connection. Every strap has been designed from the ground up, incorporating features for your comfort:

  • Cam Lever Lock adjusters that actually stay locked
  • Neck and shoulder padding that eases irritation and increases airflow
  • Hypalon-reinforced stitching for durability
  • Optional padded linings for those long days of shooting

Founder’s Quote

“This project has been eight years in the making, though massively interrupted by the pandemic, so we’re incredibly excited to bring the Axis Strap System to market. I genuinely believe that QD is the future of camera-carrying solutions, and we will be bringing this technology to many more products in the future.
We’re also delighted that we’re creating a production facility in the UK for these straps, so they can proudly carry the ‘Made in Great Britain’ mark.”
Danny Lenihan, Founder & CEO, 3 Legged Thing


Kickstarter Launch

The Axis Kickstarter campaign runs for 31 days from 9 September 2025. Backers can expect substantial discounts across the range, with the biggest savings reserved for early adopters.

Final thoughts from us after a week of use – I put the Axis straps through a soccer match and a 32-person team photo, and the QD buckle system stood out straight away — solid, versatile, and a real gamechanger! A pleasure to use.

We wish them the best of luck on a great product!

The post 3 Legged Thing Unveils Axis Strap System on Kickstarter appeared first on Digital Photography School. It was authored by Sime.

How to Choose a Flash: 5 Things to Consider

The post How to Choose a Flash: 5 Things to Consider appeared first on Digital Photography School. It was authored by Kunal Malhotra.

How to choose a flash: Five key considerations

Lighting often makes or breaks a photograph, but thanks to the power and portability of the speedlight, it’s easier than ever to capture well-lit shots indoors, in heavy shade, or even at night.

Unfortunately, for photography beginners – and even for folks who have been shooting for years or decades – choosing the correct external flash can be a huge challenge. There are countless brands on the market today offering a wide variety of flashes, which makes flash shopping confusing and sometimes even frustrating.

But all hope is not lost! As an experienced flash photographer, I’m familiar with the benefits and drawbacks of different flash models; below, I share the five essential items that you absolutely must consider before investing in a flash. That way, you don’t waste your money on a low-quality model that won’t meet your needs.

Ready to pick out the perfect flash? Let’s dive right in.

1. The brand

How to choose a flash

Back in the day, buying a flash was really simple. If you wanted to purchase a speedlight, then you had to pick one offered by your camera manufacturer (usually Nikon or Canon).

Today, however, the situation is completely different, and the market is flooded with other companies that sell speedlights, including Yongnuo, Godox, and Nissin. You still have the option to buy a flash from your own camera manufacturer, but you can also choose third-party models.

Look up the flashes sold by Nikon and Canon, and you’ll notice that they’re extremely expensive compared to third-party options from Yongnuo and Godox. Despite this sticking point, many photographers believe that these Nikon and Canon models are still a better buy, claiming that they boast a longer life, enhanced durability, and better compatibility.

On the other hand, some third-party speedlights genuinely are very well designed, and they can certainly compete with the big brands on performance, durability, and more. Another plus is that third-party flashes are generally a lot cheaper, which is a key point for those looking to buy their first flash.

If you’re not sure whether you’re comfortable purchasing a third-party flash, it’s a good idea to read a few reviews. While some of these models are outstanding, others can be cheap and breakable, so it pays to be informed before you hit the “Buy” button.

2. Flash longevity

How to choose a flash

Just like any other lightbulb, speedlights have a limited life; after a certain amount of use, they’ll “burn out” and stop working.

So before purchasing any speedlight – no matter the company or model – do some research. Look for your selected speedlight’s lifespan listed on the company website, and if you can’t find official specifications, you can always look at Amazon reviews, which users sometimes update to indicate when an item has stopped working.

Bear in mind that you’ll occasionally run into a bad flash unit, so if you find a user reporting that their flash stopped working after three shots or was dead on arrival, don’t immediately dismiss that model. However, if a slew of reviewers claim that a flash died soon after purchase, then it’s best to avoid that product (and perhaps even that brand).

How to choose a flash

One more thing: It’s important that you purchase a flash that doesn’t just work for a long time, but that works well; in other words, the flash should fire properly and at full power. If the flash doesn’t fire properly – even if it produces some light – it’ll generally give you an unusable result.

3. Flexibility

How to choose a flash

Pop-up flashes – that is, the flashes that come mounted to some cameras – are disliked by most artificial-light photographers for one major reason: They’re completely fixed and offer zero flexibility. They only point in one direction, and they cannot be rotated, pointed upward or downward, or taken off the camera. Thus, the light cannot be controlled or bounced to create a more flattering effect.

Therefore, it’s extremely important to check the flexibility of a flash unit before purchasing. If the head of the flash you buy cannot be moved, tilted, or angled, then you’ll struggle to achieve high-quality results.

How to choose a flash

I’d also recommend researching whether the flash can be triggered remotely. Many studio portrait and still-life photographers prefer to mount their flashes on stands rather than the camera itself, but if the flash doesn’t offer a remote-trigger option, you may grow frustrated. (You’ll also need to check remote trigger compatibility, which can vary depending on the model.)

4. Automatic (TTL) or manual control

There are two basic types of flashes: automatic (TTL) models and manual models.

An automatic flash interacts and communicates with the camera to determine the optimal amount of light required to illuminate a particular scene. In other words, a TTL flash will change its output in response to the ambient light levels in the scene.

How to choose a flash

A manual flash, on the other hand, has to be directed by the photographer at all times. If you want to expose for a dark scene, for instance, you’ll need to manually increase the flash power, and if you want to expose for a brighter scene, you’ll need to manually decrease the flash power.

So which type of flash is better? On the one hand, automatic models are extremely convenient. You can mount the flash on a stand or your camera’s hot shoe, press the shutter button, and expect to get relatively solid exposure results.

How to choose a flash

On the other hand, manual flashes tend to be far cheaper, which makes them a great option for beginners. And because they force you to really understand the ins and outs of flash exposure, they can be a good teaching tool.

At the end of the day, the choice is up to you!

5. Flash recycle time

How to choose a flash

If you’re planning to capture studio portraits or still life shots, this shouldn’t be an issue – but if you’re a serious action photographer who may need to capture multiple bursts of images over a short period of time, then the flash recycle rate is essential.

You see, the recycle rate (also known as the recycle time) is simply the length of time after the flash fires before it’s ready to fire again. Manufacturers almost always list the recycle rate in terms of seconds, and as you can probably imagine, the lower the recycle rate, the better. A flash that can recycle quickly will allow you to capture a burst of sports images – but a flash that recycles slowly may prevent you from creating the photos that you’re after.

How to choose a flash

Note that speedlight specs generally mention two different times (e.g., 0.3-5 seconds). The lower number denotes how soon another shot can be taken if the flash is set to its lowest light output, while the higher number indicates how soon another shot can be taken when the flash is set to its highest light output.

The recycle rate at the flash’s maximum output is more important, and if you want to shoot action, you should always aim to get a flash that has a shorter maximum light output time. Remember, however, that you also need to buy a proper battery for your flash if you want to achieve the recycle rate mentioned by the manufacturer.

How to choose a flash: final words

Now that you’ve finished this article, you should be ready to purchase a speedlight of your own.

But remember that there is no single best flash that’ll appeal to everyone. It really all comes down to your budget and needs; beginners will generally be well served by a manual flash, though more experienced shooters – especially those who work in fast-paced environments – may want to consider an automatic model.

Now over to you:

What flash do you plan to buy? How did you choose? Share your thoughts in the comments below!

The post How to Choose a Flash: 5 Things to Consider appeared first on Digital Photography School. It was authored by Kunal Malhotra.