Another Tamron lens! And I’ve got to say, after trying their last few releases, it’s clear they’re on a roll — seriously good glass at prices that make sense.
Their latest is the Tamron 25-200mm F/2.8-5.6 Di III VXD G2 (Model A075) for Sony E-mount full-frame mirrorless cameras. On paper, it looks like the perfect “do-it-all” lens — one that could easily become your go-to for travel, family events, or sports days.
Think about it: at 25mm, you can shoot a wide team photo or a sweeping landscape, then zoom all the way to 200mm to capture the game action or your kids mid-celebration — without ever changing lenses. I’ve been taking those post-match, “kids-hyped-up-on-oranges-and-lollie-snakes” team shots for years, and a lens like this would’ve made life so much easier.
What’s New in the G2 Version
This new G2 model replaces the popular 28-200mm F/2.8-5.6 Di III RXD (Model A071). Tamron has made some smart updates — widening the zoom range from 28mm to 25mm, improving autofocus speed and accuracy, and keeping the lens surprisingly compact for its range.
It’s powered by Tamron’s VXD (Voice-coil eXtreme-torque Drive) linear motor, which gives it quick, quiet, and precise autofocus — ideal for fast-moving subjects like sports, pets, or kids.
At the wide end (25mm), it even offers half-macro capability with a 1:1.9 magnification ratio, letting you capture close-up detail shots without switching lenses.
Why It’s Great for Beginners and Travellers
If you’re new to photography, an all-in-one zoom like this can be a real confidence booster. You’ll spend less time worrying about which lens to use and more time shooting. It’s also a brilliant option for travel — light enough to carry all day, but versatile enough to cover everything from street scenes to wildlife.
And because it’s compatible with Tamron Lens Utility, you can tweak settings and customise functions straight from your smartphone or computer — a nice touch if you like fine-tuning your gear.
Key Features
Focal range: 25–200mm (8x zoom)
Maximum aperture: f/2.8–5.6
Autofocus: Fast and precise VXD linear motor
Close-up performance: Half-macro (1:1.9 magnification at 25mm)
Filter size: 67mm (same as most Tamron lenses)
Customisable: Compatible with Tamron Lens Utility
Release date: November 20, 2025
Price: USD $899 / CAD $1,199
The Bottom Line
Tamron has built a reputation for making lenses that punch well above their price point, and the new 25-200mm F/2.8-5.6 G2 looks like another solid step forward. Whether you’re a beginner looking for your first all-round lens, or a more experienced shooter who wants something lightweight and versatile, this one’s definitely worth keeping an eye on.
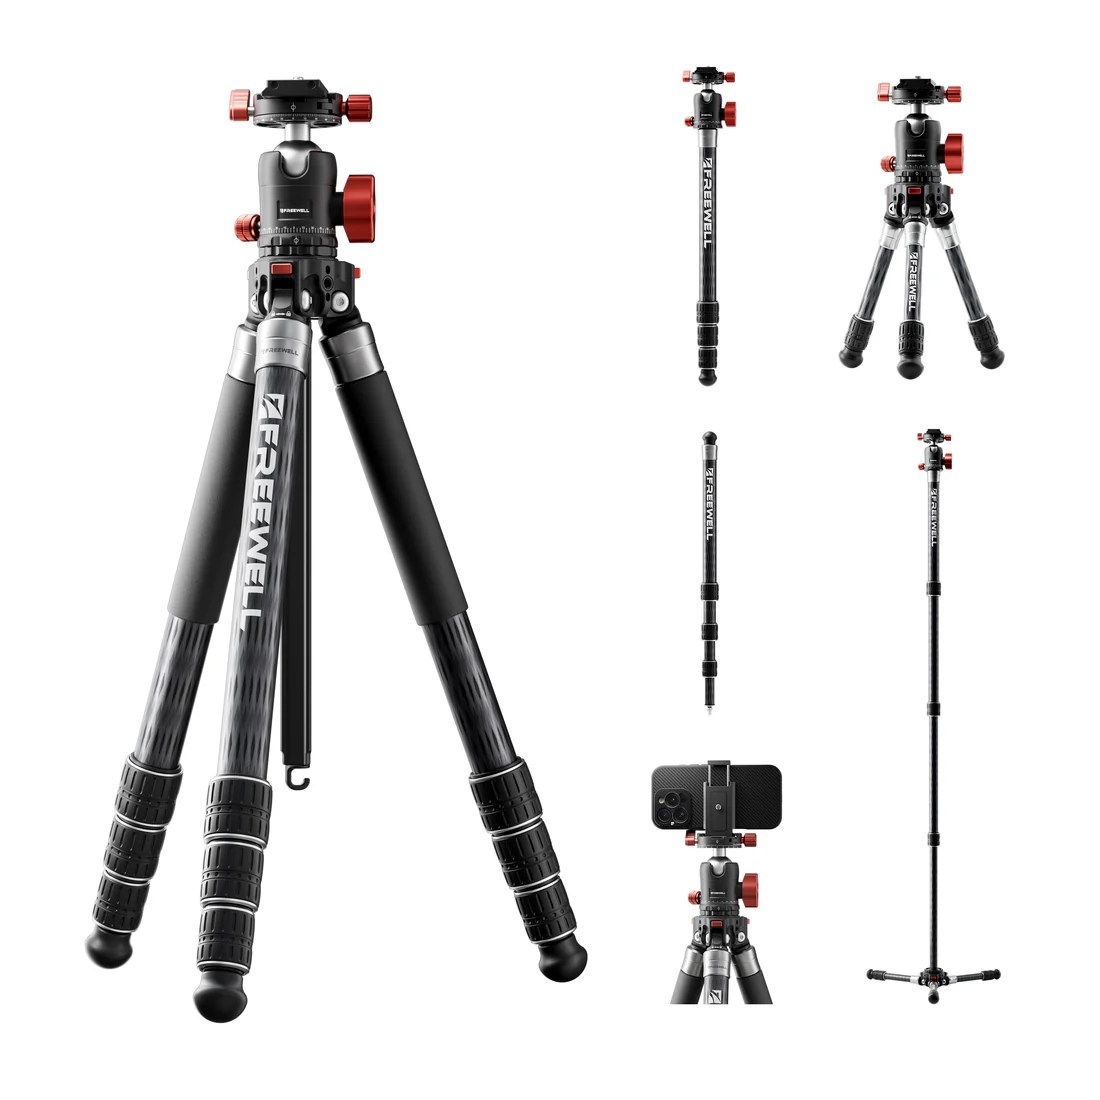
The Freewell Real Multi Tripod 5-in-1 is a versatile, multi-function support system that’s clearly aimed at photographers and content creators who want one piece of gear to do many jobs. According to the manufacturer, it offers five modes (tripod, two types of monopod, desktop mode, and trekking-pole mode) and supports up to 20 kg of payload.
For someone new to photography, that instantly makes it appealing: you’re not just locked into one height/tripod scenario, you can experiment with angles, surfaces and shooting styles.
After a little time working out how each mode worked, the tripod did a great job in all of its modes, a great phone holder, a sturdy tripod with really solid feeling hardware, a handy desktop tripod for live streaming or photography, a walking pole (I’ve not used this as a walking pole for the test, but I have used walking poles before (Machu Picchu) and they’re pretty handy! As well as a regular or stabilised mono-pod.
As a “tripod multi-tool, and for a the comparatively low price, considering all of the things this Tripod MacGyver does, it’s great value for someone starting out and looking for a good solid, but less expensive choice. (Currently $279 on Freewellgear.com )
Key Features & What They Mean for Beginners
Here are the main specs and features, and what they translate to in practice if you’re just starting out.
Five modes: Full tripod, two monopod variants, desktop mode (for low angle or table-top usage), and trekking pole mode.
What it means: You can use this gear for more than just “camera on a stand”. Want to shoot selfies or video with a phone or mirrorless? Want to go out and hike and still have a support tool? It covers lots of bases.
Smartphone mounting built-in: Retractable clamps convert the included arca swiss compatible tripod plate into a smartphone holder. (You can buy these individually for $19.99, handy if you want to use your phone mounted on another arca swiss compatible tripod)
Why this matters: If you’re using your phone for practice or even learning photography via mobile, this gives you a leg-up. No need for a separate phone tripod or clamp.
Height and angle flexibility: From a minimum height of ~17.5 cm (~175 mm) up to ~1.57 m maximum height. Legs lock at angles like 22°, 55°, 85° for uneven surfaces.
For beginners: Good for experimenting with low-angle (dramatic) shots as well as standing height. The adjustable leg angles help when you’re shooting on a hill, grass, or uneven pavement.
Inverted column / low-angle shots: The center column can be inverted for really low viewpoints (macro or creative shots). Freewell Gear
What you’ll love: When you start exploring creative composition (getting low, shooting up at your subject, etc) this gives you an extra tool.
Payload & build: Supports up to 20 kg (44 lbs) thanks to carbon-fibre + aluminium alloy construction. Weighs ~1.65 kg.
What’s in the box?: The tripod, three desktop short legs, the phone/arca swiss camera plate, a load hook to anchor your tripod down in a stiff wind, a weight hook for the same thing, tools, a user manual and it’s all packed in a decent little tripod carry bag.
Why it’s relevant: For a beginner it means you can grow your gear (larger camera bodies, heavier lenses) and not immediately out-grow the tripod. Also the lighter weight helps portability.
Strengths (especially for beginners)
Here are what I see as big pluses, especially if you are just getting started.
Versatility: This is the major selling point. One tool that adapts rather than buying separate tripod + monopod + smartphone stand.
Encourages experimentation: With modes like desktop and trekking-pole you’re nudged to try different shooting scenarios beyond “camera on a stick”.
Good value for what it offers: The spec sheet is impressive for the price and gives you a “future-proof” element (i.e. supports heavy gear, many modes).
Smartphone friendly: A good nod to how many beginners start on mobile or want hybrid setups.
Stable build and strong payload: Should support a wide variety of camera setups, meaning you’re less likely to need upgrades right away.
Considerations / Potential Drawbacks
No product is perfect, and there are a few things to be aware of.
Complexity / mode-switching learning curve: When a tool offers many modes, sometimes the “switching from one to another” can be fiddly. Beginners may spend more time setting up than shooting until they familiarise themselves.
Trade-off between portability and robustness: Although 1.65 kg is decent, it’s not ultra-light compared to minimal travel tripods. If your primary aim is ultra compact travel with just a mirrorless camera, there may be lighter simpler options.
Size and folded length: While adjustable height is good, depending on your bag / carrying style you might notice the footprint of the fully-featured legs and mechanisms.
Not dedicated to one thing: Because it tries to cover many roles (tripod, trekking pole, etc), each mode might not outperform the best dedicated gear in that role. For example, a specialised trekking pole or a dedicated travel tripod might have slight advantages in those individual niches.
How I’d Recommend Using It as a Beginner
Here are some practical ways you can get the most from this tripod as you start your photography journey:
Start simple: Use it in full tripod mode for typical still-photography — landscape, portraits, family shots. Get used to mounting your camera, extending the legs, adjusting the head.
Explore low angles: Try the inverted column or low-angle mode. Shoot at ground level for a different perspective (e.g., from leaves up to tree branches). This helps build your creative eye.
Use desktop mode: This is great for indoor setups, still life, or constant-place shots (e.g., product photography, tabletop, even video calls).
Mobile + camera hybrid: Use the smartphone mount to practice mobile photography or video, and switch to the camera when you feel confident.
Outdoor adventures: When you’re ready to go hiking or travel, use the trekking pole mode or monopod mode. This gives you support and flexibility outdoors.
Grow into it: Because it supports up to 20 kg, you won’t feel limited as you upgrade lenses or camera bodies. You can keep this tripod for a while rather than needing to replace it early.
Final Verdict
For a beginner photographer, the Freewell Real Multi Tripod 5-in-1 is highly recommended if you are looking for a flexible, multi-purpose support tool that allows you to experiment, grow, and cover a wide range of shooting scenarios. It gives you strong value, and encourages creative exploration beyond just “tripod on flat ground”.
If your focus is extremely lightweight travel gear (just a very small mirrorless camera, minimal kit) and you never plan to monopod or do low-angle or trekking modes, you might find a simpler, lighter tripod sufficient. But if you like the idea of one piece of kit doing many roles, this is a solid pick.
Q. Do you still use a dSLR 24-70 or have you upgraded to a more modern mirrorless mount equivalent?
Why do photographers everywhere seem to be obsessed with 24-70mm lenses? Whether you’re just starting out or you’ve been shooting for a while, you’ve likely encountered the 24-70mm lens, and it’s important that you understand just what makes this lens so popular – and why you might want to consider investing in one.
Below, I walk you through what makes the 24-70mm lens so special. You’ll learn about why it’s such a great choice for all kinds of photography, its technical aspects, and some handy tips for making the most out of it. I also share plenty of 24-70mm photo examples, so you know what to expect after buying.
Let’s get started.
What is a 24-70mm lens?
You might have heard photographers raving about the 24-70mm lens – and for good reason. Let’s dig into what exactly this lens is.
A 24-70mm lens isn’t exactly a wide-angle lens, nor is it a telephoto lens. It’s what’s often called a standard zoom or a wide-to-telephoto zoom. Why? Because it starts at a wide-angle focal length of 24mm and goes all the way up to a short-telephoto focal length of 70mm. It’s a lens that covers a lot of ground in one package.
If you’re using an APS-C camera, things change a bit. A 24-70mm lens on an APS-C camera offers an effective focal length of roughly 35-105mm. In other words, it tones down the wide-angle perspective and gives you a bit more reach on the long end.
The 24-70mm zoom is incredibly popular. In fact, I would say it’s one of the most common, if not the most common, zoom lenses used by enthusiasts and professionals. It’s a go-to lens for many because of its amazing versatility, impressive optics, and great design.
And it’s not just one or two manufacturers making these lenses. All the big names in the lens world offer 24-70mm glass, which tells you something about its importance in photography.
Common subjects for 24-70mm photography
The 24-70mm lens is highly versatile, so it’s used to photograph in a wide variety of scenarios. Here are a few genres where this lens really shines:
Portrait photography: The 24-70mm lens can capture stunning wide-angle portraits as well as full-body poses and tight headshots. It’ll also prevent you from needing to change lenses while shooting. Imagine the flow and the connection you can maintain with your subject without pausing to swap glass.
Wedding and event photography: The 24-70mm focal length range allows for both wider and tighter compositions so you can capture the grandeur of a wedding ceremony at 24mm and then zoom in for intimate shots of the bride and groom at 70mm. Planning to photograph indoor or nighttime events? The f/2.8 version of this lens ensures quality images in challenging lighting conditions.
Landscape photography: While the 24mm end doesn’t offer the ultra-wide perspective loved by many landscape shooters, it still provides a reasonably wide field of view. Imagine a breathtaking mountain range or a vast desert; you can capture the entire expanse at 24mm and then zoom in to 50mm or 70mm for more intimate compositions.
Still-life photography: 24-70mm lenses can also come in handy when photographing food, products, and other still-life subjects; as I explore in greater detail below, these lenses tend to offer surprisingly solid close-focusing capabilities. Plus, the optics are impressively sharp – always a benefit when doing close-up photography!
Bottom line: A 24-70mm lens won’t limit you to specific types of photography, and it’s like having several lenses in one. Whether you’re capturing faces, events, or nature’s beauty, this lens will adapt to your needs and provide endless creative possibilities.
24-70mm f/2.8 vs 24-70mm f/4 lenses
If you’re considering your first 24-70mm lens, you might be confused by the number of options out there. Maybe you’re struggling to decide which version to buy. Let me help clear things up for you.
The 24-70mm lens is generally offered in two variations: f/2.8 and f/4. This number refers to the maximum aperture offered by the lens: the f/2.8 version is able to use a wider f/2.8 aperture, whereas the f/4 version can only widen the aperture to f/4. As a result, the f/2.8 version can take in more light compared to the f/4 version.
The optical difference between 24-70mm f/2.8 and f/4 lenses might not seem massive. For some photographers, it isn’t. But it can matter significantly in a few specific scenarios. And when choosing between an f/2.8 and f/4 lens, there are some additional consequences that you’ll want to consider.
First of all, because the f/2.8 version can gather more light, it allows for better handheld images in darker scenarios. Thanks to the light boost, you won’t need to drop your shutter speed or raise your ISO, and this means you can capture images that are sharper and less noisy. (It’s the reason why many wedding and event photographers only work with a 24-70mm f/2.8.)
Second, wider apertures produce a shallower depth of field effect, so the f/2.8 version allows for more intense background bokeh. This is especially important in portrait photography. If you’re serious about portraits, I recommend purchasing the 24-70mm f/2.8 over the 24-70mm f/4. Can you still produce nice background blur with an f/4 lens? Yes, but it’ll be a lot harder to do, and often won’t look quite as good.
On the other hand, these wide-aperture zooms do tend to be heftier than their narrow-aperture counterparts. And they are far, far pricier.
Therefore, unless you specifically need an f/2.8 version of the 24-70mm lens for handheld low-light shooting or background bokeh effects, it’s a good idea to go for the f/4 version. It’ll get you the same results – at half the price, and with half the heft.
24-70mm f/2.8 lenses tend to be larger and heavier than 24-70mm f/4 lenses.
Making the right choice between these two versions requires you to know what you’re after. Consider your shooting style, subjects, and budget. Both options have their merits, and understanding them will guide you toward the perfect 24-70mm lens for your photography needs.
Reasons you should use a 24-70mm lens
Not yet sold on a 24-70mm lens? No problem! Here are a few reasons why I love my 24-70mm glass:
1. There is no learning curve
The focal length of a 24-70mm lens stretches from wide-angle to short telephoto – but the bulk of its range sits in the standard focal length spot, which corresponds closely to the human eye. Therefore, to use a 24-70mm lens, you don’t need to learn to see differently; instead, looking through a 24-70mm, you’ll get a very natural field of view.
In fact, when you’re photographing as the eye sees, it’s much easier to learn composition. You can spot interesting subjects, bring your camera to your eye, and snap away – whereas ultra-wide lenses and telephoto lenses force you to think about the field of view, distortion, compression, and how they change the scene.
Even at 24mm, distortion is limited. So you can do wide-angle photography without worrying about wide-angle effects. And at 70mm, you can zoom in for tighter compositions while still capturing a relatively neutral perspective.
Plus, the 50mm focal length is outstanding for portrait photography: not so long that you lose intimacy, and not so wide that you stretch the subject. Instead, it’s just right.
2. 24-70mm lenses offer close focusing
24-70mm lenses are designed for standard-sized subjects, right?
Well, yes…and no.
You see, while these lenses are often created with portrait, landscape, and nature subjects in mind, they also offer impressive close-focusing capabilities. The minimum focusing distance does vary from model to model, but it’s generally around 15 inches (38 centimeters).
In other words, you can use a 24-70mm lens to capture stunning close-up shots – of flowers, leaves, portrait details, and more. What’s especially exciting is how flexible a 24-70mm lens can be; if you’re photographing a portrait subject, you can step back for a nice full-body shot, move in slightly for a head-and-shoulders composition, then move in even closer for a detail photo of your subject’s eyes, ears, or clothing.
Event photographers use this close-focusing flexibility all the time. Zoom out for a shot of the wedding guests, step in for a shot of the centerpieces, zoom out for a shot of the ceiling, step in for a shot of the place settings.
And if you like to shoot landscapes, you can capture sweeping scenics at 24mm, then zoom in to 70mm and get in close for details of rocks, sand patterns, etc.
It’s so convenient, and it’s all thanks to the power of a 24-70mm lens.
3. The focal length range is incredibly versatile
I’ve already touched on this, but it’s arguably the most important benefit of a 24-70mm lens, so it deserves its own section.
You see, with a 24-70mm lens, you can shoot at a slew of different focal lengths, from wide to standard to telephoto, and this range offers limitless possibilities in the face of demanding photoshoots.
First of all, when doing a single photoshoot, you can easily go from a wide angle to a zoom, adjusting quickly as the scene and your subjects change. And you won’t have to switch out your lens at all, which will keep the flow of the photoshoot intact and will prevent you from missing key moments as you switch from one lens to the next.
Plus, the versatility of a 24-70mm lens means that you can work with it and nothing else, even as you go gallivanting across the world for destination shoots and vacations. Imagine heading to a photoshoot with just one lens in your bag. Nice, right?
4. The build is robust and comfortable
Most 24-70mm lenses are impressively robust, featuring a solid build that’s designed to last. Manufacturers know that these are “walkaround” lenses, so they’ve made sure a 24-70mm can handle anything you might face, from rain and snow to blowing sand and dust.
If you frequently shoot in deserts, near waterfalls, or at the beach, then a 24-70mm lens will be a lifesaver, allowing you to capture all sorts of compositions without worrying about ruining your precious optics. Of course, you should always practice proper lens care; I don’t recommend you drop your lens in the water, let it get soaked, and so on. But as far as lenses go, 24-70mm options tend to be very solid.
(And you’ll need a well-built camera, too; while 24-70mm lenses are amazing, they can’t protect your camera electronics!)
Additionally, 24-70mm lenses feel great in the hands. They’re not so long that you’ll get tired after a few hours, and they’re not so short that you have nothing to grip. You can comfortably use a 24-70mm lens for day-long photoshoots, and you’ll always feel like you’re working with an actual, solid lens.
5. The size and weight are perfect for pretty much everything
On average, 24-70mm lenses measure around 3.3 x 3.3 x 4.9 inches (8.4 x 8.4 x 12.4 centimeters), and they weigh approximately 2 pounds (900 grams).
While these lenses aren’t tiny, they’re certainly not large, nor are they heavy. They fit in pretty much any camera bag you’ll ever encounter, even when they’re attached to a camera – so you can carry your setup in a shoulder-sling bag or a backpack without any trouble. Plus, because 24-70mm lenses are pretty short, you can hang your camera around your neck and you won’t feel like you’re carrying a brick.
In fact, my 50mm (f/1.2) lens weighs more than my 24-70mm lens, even though it’s shorter. And I’ve even managed to put my camera and 24-70mm lens in a regular old purse (which can come in handy in quite a few situations).
Bottom line: A 24-70mm lens is sized for photographic adventures of all types, from treks in the mountains to casual walks around the city to travel photography across the globe.
Tips for working with a 24-70mm lens
You’ve got your 24-70mm lens and you’re excited to use it. But before you start snapping away, there are some tips and tricks that can help you get the most out of this lens:
1. Practice using the lens at every focal length
First off, make sure you understand what each focal length in your lens’s range (24mm to 70mm) can do.
Spend some time experimenting with different focal lengths. See how they affect your compositions.
Try photographing a single subject at 24mm, then at 35mm, then at 50mm, then at 70mm. Pull up the images on your computer and observe them side by side. Ask yourself: How does each focal length change the view of the subject?
Soon, you’ll get to know how each focal length will look – even before you look through the viewfinder. You won’t waste valuable time zooming in and out to find the perfect shot.
2. Watch the distortion
When shooting at the wide end of your 24-70mm lens, you may notice some distortion.
This means that straight lines will seem to converge, and objects close to the lens might look a bit stretched or skewed.
Distortion like this – known as perspective distortion – isn’t always bad, and it can be used artistically to great effect. But it’s important to be hyper-aware of its effects because it can result in unflattering photos if you’re not careful.
If you are trying to minimize distortion at 24mm, make sure that your subjects are decently far from the front of the lens, and do your best to keep the lens parallel to the ground (i.e., not angled upward or downward).
3. Don’t rely too heavily on the zoom
A zoom lens can make it tempting to stand in one spot and just twist the lens barrel to change the composition. But while the zoom on 24-70mm lenses is fantastic and highly useful, but it doesn’t replace the need to move physically closer to your subject.
For one, moving around can help you fine-tune your compositions. And it can also give you a completely different perspective.
So get into the habit of using a mix of movement and focal-length adjustment. That way, you’ll get the best results and discover perspectives you might have otherwise missed.
Remember, photography is as much about the movement and physical positioning of the photographer as it is about the focal length!
4. Turn on that image stabilization
Many 24-70mm lenses come with image stabilization. It’s a handy little feature that helps counteract camera shake; that way, you can photograph handheld at slower shutter speeds in the 1/20s-1/60s range, which is especially useful in low-light scenarios such as evening portrait sessions and indoor events.
So whenever you’re photographing a relatively stationary subject and you don’t have access to a tripod (or you simply don’t want to use one), switch on that image stabilization.
That said, there are a couple of caveats to bear in mind. First, if you are using a tripod, make sure that you switch that image stabilization off. Otherwise, you might find that it actually increases the blur in your photos.
And second, be aware that image stabilization generally won’t help you capture sharp photos of moving subjects. For that, you’ll need a fast shutter speed.
5. Watch the background
The 24-70mm lens might not be considered a true wide-angle lens, but it still offers some wide focal lengths, especially in the 24-50mm range. And when shooting wide-angle compositions, you might notice that the background in your shots often turns out relatively sharp, even if you’re using a wide aperture.
What does this mean for you?
It means you need to pay careful attention to what’s happening behind your subject. A distracting background can easily take the focus away from your main subject. Maybe it’s a bright sign in a street scene or a branch sticking out in a nature shot. Whatever it is, you’ll want to make the effort to keep it out of your shots.
If you find yourself in an area where the background might cause some issues, try moving around your subject. Walk to the right or left, get down low, or even climb up high if you can. It’s all about finding the right angle that lets your subject shine without any background interference.
6. Consider using a lens filter for protection
Investing in a good 24-70mm lens can be a significant expense. Such a lens will generally be optically excellent, and you’ll want to take care of it as much as possible.
That’s why I recommend adding a UV filter or a clear filter to the front of your lens. It’ll protect your precious glass from accidental bumps or those unexpected finger smudges.
So if you’re planning to spend a lot of time with your 24-70mm lens, do consider investing in a good-quality lens filter. It’s a simple step that can go a long way in keeping your lens safe and your images looking their best.
24-70mm lens photography: final words
And there you have it! You’ve learned all about the 24-70mm lens and its impressive capabilities, including why it’s so incredibly popular.
You’ve also learned about the different versions available and even picked up some handy tips. Whether you’re capturing the grandeur of landscapes, the intimacy of a wedding, or the expression of a portrait, this lens offers the flexibility you need.
Investing in a 24-70mm lens might just be the step that takes your photography to the next level. The world through a 24-70mm lens is rich and varied, and it’s waiting for you to explore!
Now over to you:
Do you think you’ll buy a 24-70mm lens? What do you plan to use it for? Share your thoughts in the comments below!
Photo editing is one of the most effective ways to give your photos a refined, professional look, but desktop editors can be frustratingly inconvenient for photographers (and expensive, too!).
Fortunately, smartphones and tablets now offer access to an impressive range of outstanding editing apps. Many of these tools are powerful, easy for beginners to grasp, and free to download. The best photo-editing apps are wildly convenient, too; you can use them to dramatically improve your shots while riding the bus, flying on a plane, or lounging in front of the couch.
The sheer number of options can be overwhelming, however – and that’s where we come in. Below, introduce you to our 15 favorite editing apps, including options for beginners, advanced users, and everyone in between. We also break down the process of choosing the perfect app for your photo-editing needs.
Ready to enhance your photos with a top-notch editing app? Let’s dive right in!
The best photo-editing apps for general editing
In this section, you’ll discover the best photo-editing apps for general adjustments. With the apps on this list, you can adjust exposure, enhance colors, crop, sharpen, and more.
Snapseed is one of the most popular photo-editing apps on the market – and for good reason. It’s very intuitive and easy to use, which makes it perfect for beginners. At the same time, Snapseed offers a lot of control for more skilled users thanks to features such as selective editing, curves, perspective correction, and much more.
You don’t need to pay any fees for using Snapseed, nor are there in-app upgrades; it’s completely free. So if you’re after a beginner-friendly photo editor that can do pretty much anything, Snapseed is a great choice.
2. Lightroom
Our award: Best paid photo-editing app
Cost: Free limited version; paid version requires an Adobe subscription ($9.99)
Most photographers have heard of Adobe Lightroom, one of the most popular editing programs in the world. But Adobe also offers Lightroom Mobile, which is a mostly full-featured mobile version of the powerful desktop editor – and as you might expect, it packs quite a punch.
You don’t need to pay to download the app, and the limited free version does allow you to do most basic editing tasks, so if you’re just looking for a basic editor, you may never want – or need – to upgrade.
For more folks hoping to really dive into photo editing, however, we do recommend upgrading to a paid plan. There are several options, all of which offer access to the Lightroom Mobile app, one or more Adobe desktop apps – such as Lightroom or Photoshop – and cloud storage so you can seamlessly edit on several devices.
The paid plan offers a wide variety of additional features, including a healing brush, selective adjustments, geometry tools, batch editing, RAW editing, and perspective corrections. (Note: If you want to use Lightroom Mobile to speed up your workflow, check out this article.)
Adobe Photoshop is the industry standard for photo editing. Its mobile version is divided into three smaller and specialized apps; the basic editor is Photoshop Express.
Photoshop Express offers one-touch solutions such as an auto-fix option and filters. It also allows you to edit and retouch with total control. And it’s packed with many fun features such as stickers and collages.
You can crop to most platforms’ formats and share directly from the app. While you don’t need an Adobe subscription to use Photoshop Express, you will need a free account.
Pixlr is a well-rounded editing app, offering all the post-processing essentials plus tons of presets and features to unleash your creativity.
There’s no need to create an account and you can download Pixlr for free, though you’ll be offered in-app purchases for overlays and stickers.
Pixlr also offers two great browser versions that you can use for free – or you can get a subscription for full access to both browser versions and other useful assets.
Best photo-editing apps for fun and filters
In this section, I’ll share the best photo-editing apps for filters and effects.
(In most cases, these apps also include a camera and some basic adjustment tools.)
5. VSCO
Our Award: Best filter app
Cost: Free limited version; $19.99/year for the full version
VSCO works as a general photo editor, but it belongs in the fun and filter category thanks to its artsy, social-media-focused features.
To use VSCO, you will need to create a (free) account. After that, you can continue to use VSCO for free, but most of the filters are sold separately.
Alternatively, you can grab a yearly subscription for $19.99 that includes 200 filters (and you have a 7-day trial to make sure it’s worth it).
Your creations can then be shared with the community, which is like- and comments-free. In other words, the VSCO community is more about the quality of the work. You can also share VSCO creations directly from the app to other social networks such as Instagram or Snapchat.
6. Prisma Photo Editor
Our Award: Best artistic editing app
Cost: Free limited version or free 3-day trial. Full version is $29.99/year.
Prisma is designed for art lovers. It’s more than just filters; Prisma uses artificial intelligence to turn your photos into artworks inspired by the greatest artists in history. And unlike other apps, Prisma adds new filters every day.
General editing is also possible (as it is with most filter apps). Though I do miss the rotation tool to correct the horizon if needed.
PicsArt Photo Editor is one of the most versatile editing apps on the market. You have a powerful in-app camera, plus tools and presets to no end. You can do anything with PicsArt, from professional applications like time-lapse photography to fun stickers and drawings.
PicsArt Photo Editor also has social media integration, as well as thematic contests that will spark your creativity.
A Color Story is the perfect app to manage your Instagram account. You can do some basic editing and apply filters to your images and videos.
New filter collections based on current trends are added often, although most do need to be purchased separately.
You can even plan your Instagram feed with the Grid feature. In fact, you can use this just to see how the feed looks after each picture you add, or you can connect it to your Instagram account for scheduling posts. That’s why A Color Story is great for maintaining a unified Instagram feed – whether you are a photographer, influencer, or community manager.
Afterlight boasts 59 filters, 66 textures, and 77 frames for you to transform your images in a single click. Some of these tools are offered for a small fee, but there is also a wide variety of free, high-quality effects to choose from.
Afterlight can also handle basic editing tasks; the app has 15 tools to make most of the adjustments you’ll need.
The Crop tool is also quite versatile; it allows you to straighten, flip, and crop freehand and to many standard ratios.
10. Photo Lab Picture Editor
Our Award: Best editing effects app
Cost: 3-day free trial, then $9.99/year or $4.99/month.
Photo Lab is full of filters and effects; you can have fun or do some professional-looking work. You can even turn your photos into cartoons, and you can swap faces and make collages.
Photo Lab is an app designed to give free rein to your creativity. It’s also a social app with a big community of followers that’ll help you stay inspired.
Best apps for specialized editing
If you’re looking for the best photo-editing apps with dedicated features, this is the list for you:
11. Foodie
Our Award: Best editing app for food photographers
Although it has all the standard photo-editing tools, Foodie is designed primarily for food photography.
You can use Foodie’s in-app camera to take pictures (and you’ll get a live view of your selected filter). There are plenty of food filter series, including Fresh, BBQ, Yum, and more.
Once you’ve chosen a filter, you can compose your image using the smart grid. For flat lays, you’ll get a yellow band across the edges of the screen when the camera is perfectly level.
Foodie is only missing one key editing feature, but it’s a big one: a crop tool. You’ll either need to compose well from the beginning or have another photo editor on hand to deal with any cropping.
Removing unwanted objects from a photo is something we all have to deal with, no matter the genre of photography.
With TouchRetouch, you can use brush and lasso tools to select an object for removal. And if you’re removing a line (e.g., telephone wires in the background), you just need to tap; it will automatically be selected and removed.
TouchRetouch also has a clone tool, plus a feature called Quick Fix to remove blemishes. Many apps offer some kind of healing brush, but as a specialized app, TouchRetouch will get you the best results.
14. Motionleap
Our Award: Best cinemagraph app
Cost: Free limited version, or one of three paid choices: $3.50/month, $18/year, or a one-time purchase of $55.
Have you seen pictures where everything is motionless – except for the water running or the coffee steam coming out of a cup? They’re called cinemagraphs, and Motionleap lets you create that effect with just a few taps and swipes.
You can also add filters, do some basic adjustments, and apply overlays. Keep in mind that the free version won’t let you export your projects and you won’t have all the tools available, so it’s worth considering a paid subscription.
If you use your photography for marketing purposes, then Canva is the app for you. It offers enough graphic design templates to fit your every need.
From creating an eye-catching Facebook post to designing an entire menu, Canva is intuitive and easy to use.
Many templates are free, though others must be purchased separately. Canva also has a browser version so you can access your projects on your computer, too.
How to pick the perfect app for editing photos
Editing apps can vary a lot in their tools and features, so before you go downloading or purchasing an editor, make sure that it suits your needs. When choosing an app for post-processing, there are five key factors we recommend you consider:
Ease of use and interface
Photography should be fun, right? That goes for editing, too. It’s crucial that the app you choose has a user-friendly and intuitive interface. If you’re a beginner, this is especially important. There are many simple and enjoyable apps out there, but others can be complicated and convoluted.
Therefore, if you’re not tech-savvy or don’t have experience with photo editors, we really recommend you pick a simple app that offers a basic design. Some come with helpful tutorial sections or walkthroughs; these are great for beginners as they’ll help you navigate the app and use the tools effectively.
If you’re an experienced photo editor, a confusing interface might not be such a hindrance, so you may want to focus less on the app interface and more on its advanced features. But remember: Every app is unique. It’s often worth your time to test out different ones.
Fortunately, most of the apps in this list are free. And even the ones that aren’t free do tend to offer trials or demo versions. So go ahead and get your hands on a few. Take them for a spin. See how comfortable they feel before you make a commitment.
Editing features
Every photo editor is different; each comes with its unique set of features, and it’s important to find one that can do what you want it to.
Are you a hobbyist or a beginner? Then you might be looking for an app that provides basic editing features, such as cropping, rotating, adjusting brightness, contrast, and saturation. Don’t forget filters, either, which can be great fun to experiment with (and can dramatically increase your editing speed).
On the flip side, maybe you’re more of an enthusiast or a pro. In that case, you might want more advanced editing features. You’ll want to look for things like layering, text addition, object removal, and masking.
Also, if you’re looking for an easy-to-use app that’ll speed up your workflow, consider an editing app with AI tools. These apps are designed to automate the editing process and can be a lifesaver if you’re dealing with a lot of photos.
One more thing: If your main goal is to accomplish one form of precision editing, consider a specialist editing app. Several of the apps on our list focus on specific types of edits, such as perspective correction or object removal – and while they can only make one adjustment, they do an excellent job.
Key accessories
The core purpose of an editing app is, well, editing. But you shouldn’t forget about the extras. These are the features that go beyond editing but can be useful for photographers and photo editors.
Some editing apps, for instance, come with built-in cameras. You can use these to shoot and edit all in one place.
And then there’s image organization. It’s not the most exciting part of photography, but it’s important. Some apps let you organize your image library with tools such as folders, ratings, and keywords.
Cloud-storage integration can also be a game-changer, especially if you like to edit on multiple devices. This feature ensures that you can do your main editing on your desktop, then switch to your phone or tablet for editing on the go, then to your laptop for editing on the job, and so on.
And last but not least, let’s discuss exporting and sharing. Some apps let you export in certain handy file formats and share directly to social media platforms, which can be a massive time-saver.
So when you’re choosing your editing app, remember to consider these additional features. They might not be essential, but they just make your life a lot easier.
Compatibility and performance
Most of the best apps for photo editing are available for both iOS and Android devices, but a few are tailored for one type of device. It’s critical to pick an app that’s a match for your smartphone or tablet.
Before you get too excited about a specific app, take a good look at the versions available. And even if the app does have Android and iPhone versions available, keep in mind the features can differ across platforms. So if you’re checking out reviews, be sure they’re for the version you’re planning to download.
Lastly, let’s talk about performance. Some apps can be quite demanding, and whether your smartphone or tablet can run it effectively depends on a variety of factors. Checking out the system requirements beforehand will save you from any unexpected crashes and frustration.
Price
Photo-editing apps range from absolutely free to relatively expensive, and their pricing models vary, too. Some can be purchased with a one-time payment. Others require a subscription.
Generally, more expensive apps come with a wider range of features. But don’t think pricier is always better. Some of the apps listed in this article offer top-notch features and cost nothing at all.
Before making a big purchase, ask yourself if you’re really going to use those advanced features. Maybe a free or less expensive app will do just fine. And don’t forget to check for free trials. It’s always a good idea to test out a paid app before committing to it.
The best photo-editing apps: final words
In the end, the ideal photo-editing app should be a perfect fit for you. It should feel comfortable to use and have everything you need to achieve your vision. Above all, it should take your photos to the next level!
So when picking the best app to edit photos, don’t rush. Explore different apps. Take advantage of those free trials. Experiment with various tools. And if you can’t decide, remember that you don’t need to pick just one; you can use two apps, three apps, or more to improve your editing workflow.
Now over to you:
Do you like any other photo-editingapps? Are there apps that should be added to this list? Share your thoughts in the comments below!
The best image-editing apps FAQ
Are paid photo-editing apps better than free photo-editing apps?
The best paid editing apps do sometimes offer more features than the best free editing apps, but there are excellent free choices such as Snapseed and Photoshop Express.
Should I have more than one editing app?
That depends on your needs. In our experience, it is useful to have different apps for different tasks.
What if I like smartphone photography but prefer to edit on my computer?
If you don’t like editing on your phone, you need to use an app that allows you to easily transfer pictures between your phone and your computer. You can use Lightroom for this (with an Adobe subscription). Another choice is to use a cloud service such as Dropbox.
What is the best photo-editing app?
We’re big fans of Snapseed and Lightroom Mobile. That said, there isn’t one app that tops all the others; it’s about which one is best for you. That will depend on your phone, your budget, and your editing needs – plus your personal preference.
Here’s our hands-on with the Freewell Locking VND/CPL Filter
(I tested the set on my Sony a7R III + Tamron 16–30mm f/2.8 G2)
If you’re just starting to experiment with filters, you’ve probably already heard about ND filters (Neutral Density) and CPLs (Circular Polarisers). ND filters let you slow your shutter speed for smooth water or motion blur in bright light, while CPLs cut glare and reflections for richer skies and more saturated colour.
The new Freewell Locking 3 to 7 stop VND/CPL combines both in one sleek, clever package — and after taking it for a spin last weekend (in crazy weather!) at the Point Lonsdale Lighthouse, I came away impressed.
A Quick Look at What’s New
For me, after experimenting with a magnetic system for a couple of years, the real standout is how the locking mechanism secures the VND/CPL filter to the adapter ring (Available in 49mm, 52mm, 55mm, 58mm, 67mm, 72mm, 77mm and 82mm) which you screw to the end of your lens, all while leaving the CPL/VND easy to manipulate, but stays securely in place. With your filter clipped into position, you can easily depress the side buttons on the red ring and spin it around to adjust your polarisation position, and there are two little tabs on the black ring that adjust your VND. (It’s good practice to adjust your variable ND first and then your Circular polariser)
I had no issues with bumping the filter tabs and accidentally changing settings, etc. That mix — a positive, confidence-inspiring lock plus a tactile, easy-to-fine-tune control ring — gives you reliable, repeatable results in the field without sacrificing on-the-fly adjustments. — the sort of detail that shows Freewell’s been listening to creators. ??
The hybrid design, meaning you get the VND with a built-in CPL at the same time, That means fewer filters to juggle, less time swapping glass in the field, and no cross-polarisation weirdness. BUT you can stack extra filters, I was sent the ND32 as well as the Snow Mist 1/4 filter. When you stack the ND32 with the VND, you get upto 10 stops of ND (fun long exposures in the middle of the day!)
Small Touches That Make a Difference
One thing that genuinely surprised me was the NFC lens cap. I will admit I thought it was a bit of a gimmick at first, but when you tap your phone to it, and it takes you straight to the Freewell Hub, where you’ll find setup videos, warranty info, and filter guides — Yeah, that’s actually super handy for anyone new to filters! New hunting around for QR codes or small paper manuals – I was about to say “who doesn’t always have their lens cap with them… but I don’t want to jinx myself!) – Nice touch, Freewell!
In Use
Mounted on my Sony a7R III with Tamron’s new 16–30mm f/2.8 G2, the Freewell filter set performed beautifully. Colour rendition stayed natural thanks to Freewell’s True Color optics, with no unwanted tint or cast to my eye — even at higher ND stops. Reflections off the water and rocks at Point Lonsdale were cleanly tamed, and the added contrast in the sky was a nice bonus. I was able to shoot a 10 second exposure at 2:30pm – Quite fun!
While I didn’t get to use the Snow Mist filter on the weekend, I really should have! You can see an example below of what the filter does – pretty much exactly what it says “Snow Mist” that light dispersion is pretty sweet!
Freewell Snow Mist 1/4 ?
Who It’s For
If you’re just getting into filters, this is a smart, long-term investment. You’ll spend less time worrying about shifting stops and more time focusing on your composition. The combination of ND + CPL, the locking mechanism, and excellent optical clarity make it a standout for both photographers and filmmakers who want reliable, repeatable results.
Freewell’s Locking VND/CPL is available now through FreewellGear.com, Amazon, and selected retailers.
Freewell Provided the filter kit to us for review, we thank them for reaching out!
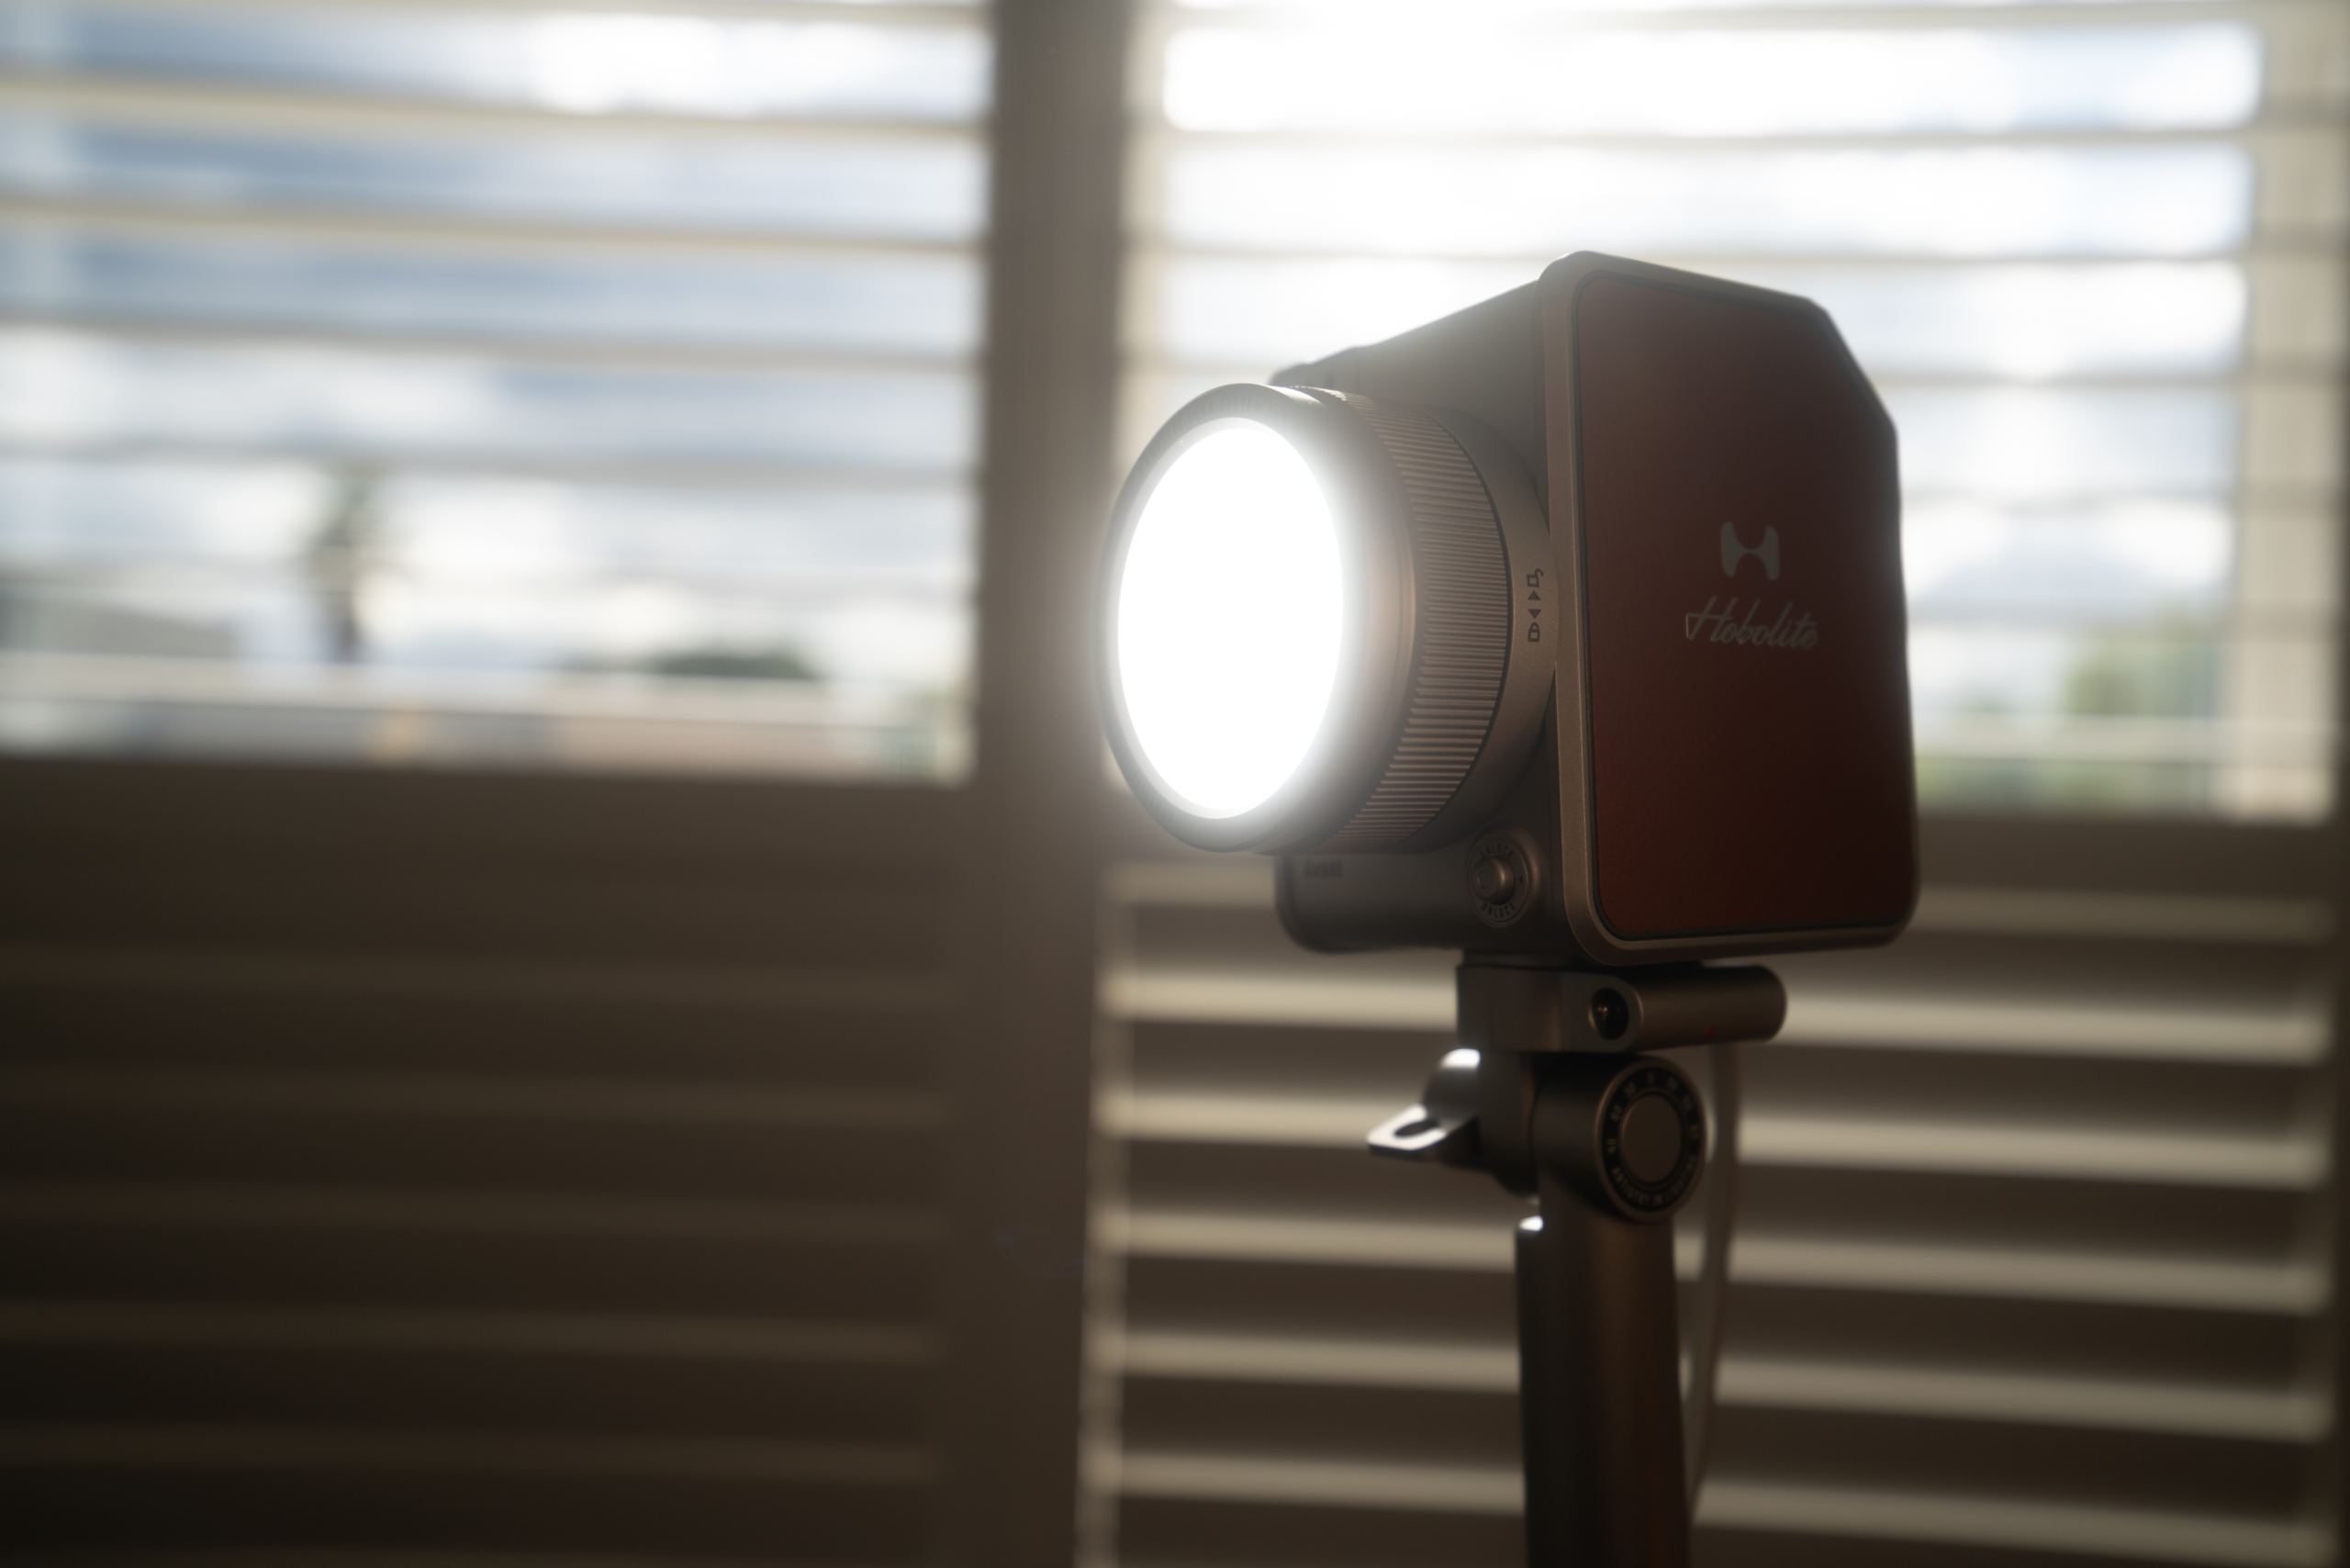
TAMRON Announcesthe Class-Leading Compact and Lightweight Telephoto Zoom70-180mm F/2.8 Di III VC VXD G2with Vibration Compensation for the “Nikon Z mount system”
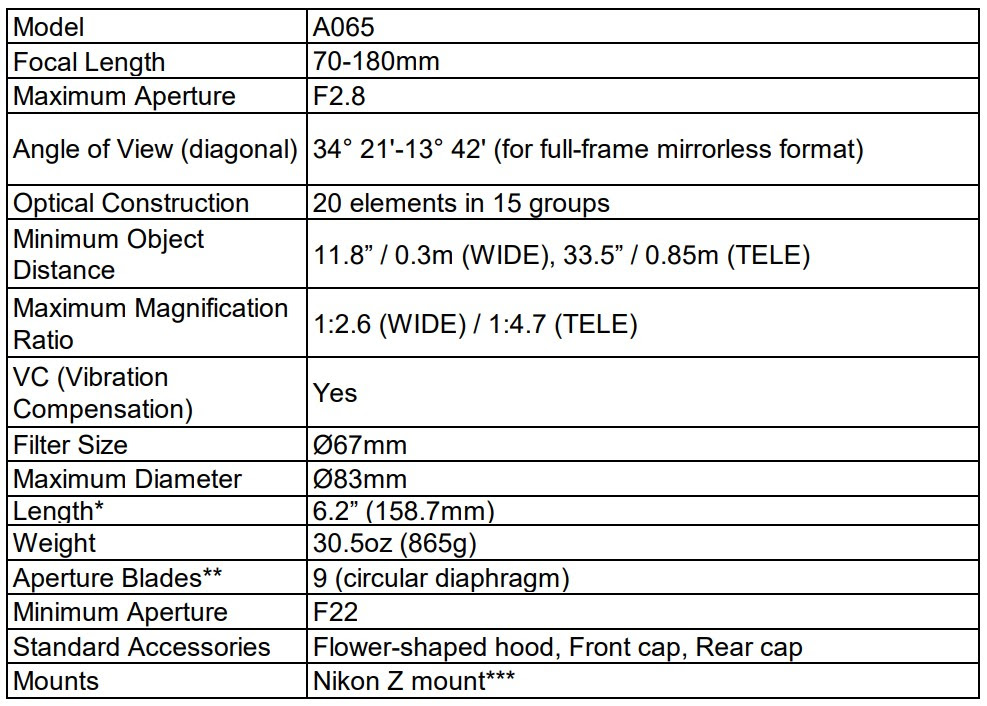
October 7, 2025, Commack, NY – TAMRON announces the launch of the 70-180mm F/2.8 Di III VC VXD G2 (Model A065), a fast-aperture telephoto zoom lens for “Nikon Z mount system” full-frame mirrorless cameras on October 23, 2025. The lens will retail for $1,149 USD / $1,549 CAD.
With this announcement of the Nikon Z mount, TAMRON expands the availability of the highly acclaimed 70-180mm F2.8 VC G2, previously announced in 2023 for Sony E-mount. Additionally, the TAMRON Trinity is now complete for Nikon Z camera users! (The Holy Trinity as FroKnowsPhoto (dot com) would say!)
The 70-180mm F2.8 VC G2 is a fast-aperture telephoto zoom lens that combines TAMRON’s proprietary VC (Vibration Compensation) image stabilization mechanism with a class-leading compact size and weightdesign [1] offering both outstanding portability and greater stability across a wide variety of scenes. It delivers uncompromising image quality throughout the entire zoom range. At the wide end, the lens achieves an MOD (Minimum Object Distance) of just 11.8” (0.3m), allowing for close-up compositions that allow expressive imagery unique to this lens. For autofocus, the lens features
TAMRON’s VXD (Voice-coil eXtreme-torque Drive) linear motor focus mechanism that delivers excellent quietness and responsiveness for high-speed, high-precision auto-focusing whether shooting stills or video. Additionally, the lens supports the TAMRON Lens Utility, software that can be used to customize functions based on various shooting styles for still photography and video. The lens is designed with a focus on operability and scratch resistance. This well-balanced lens combines portability, high imaging quality, and excellent usability.
[1] Among full-frame compatible fast-aperture F2.8 telephoto zoom lenses equipped with Vibration Compensation (As of October 2025: TAMRON)
? Product FeaturesWorld’s smallest and lightest F2.8 tele-zoom lens is designed to fit comfortably in your handFast F2.8 aperture performance captures the world in vivid detail from portraits to landscapesTamron’s proprietary VC image stabilization mechanism empowers mobilityDecisive moments are never missed with improved fast and precise AF tracking performance powered by TAMRON’s VXD linear autofocus mechanism MOD of 11.8” (0.3m) opens new possibilities such as tabletop photography
Compatible with TAMRON Lens Utility software (desktop and mobile app) Comfortable ergonomic design for ease of use Unified Ø67mm filter size Complete G2 trinity, “daisangen”, covers 16mm to 180mm focal length range Supports key camera functions Protective features (moisture-resistant construction and fluorine coating)
SPECIFICATIONS
* Length is the distance from the front end of the lens to the lens mount face.** The circular diaphragm stays almost perfectly circular up to two stops down from maximum aperture.***Previously released for Sony E-mount.Specifications, appearance, functionality, etc. are subject to change without prior notice.This product is developed, manufactured, and sold under the license agreement with Nikon Corporation.
Because we’re over here in Australia, we found this video from Photography With Antonio, Via Tamron Australia… Pleasantly Surprised – Lovely! Well worth checking it out if you get the chance.
Plenty of photographers love wide-angle lenses, and for good reason: Wide-angle lenses can capture breathtaking landscapes, stunning environmental portraiture, jaw-dropping architecture, and so much more.
But what exactly is a wide-angle lens? And how can you create amazing wide-angle photography?
In this guide, I explain everything you need to know about working with wide-angle glass. I offer basic definitions, and I also share my favorite tips for wide-angle images – so that, by the time you’re finished reading, you’ll be ready to capture pro-level results.
Let’s dive right in!
What is a wide-angle lens?
A wide-angle lens provides an image that’s wider than what you can see with your eyes. Wide-angle focal lengths sit in the 8mm to 45mm range.
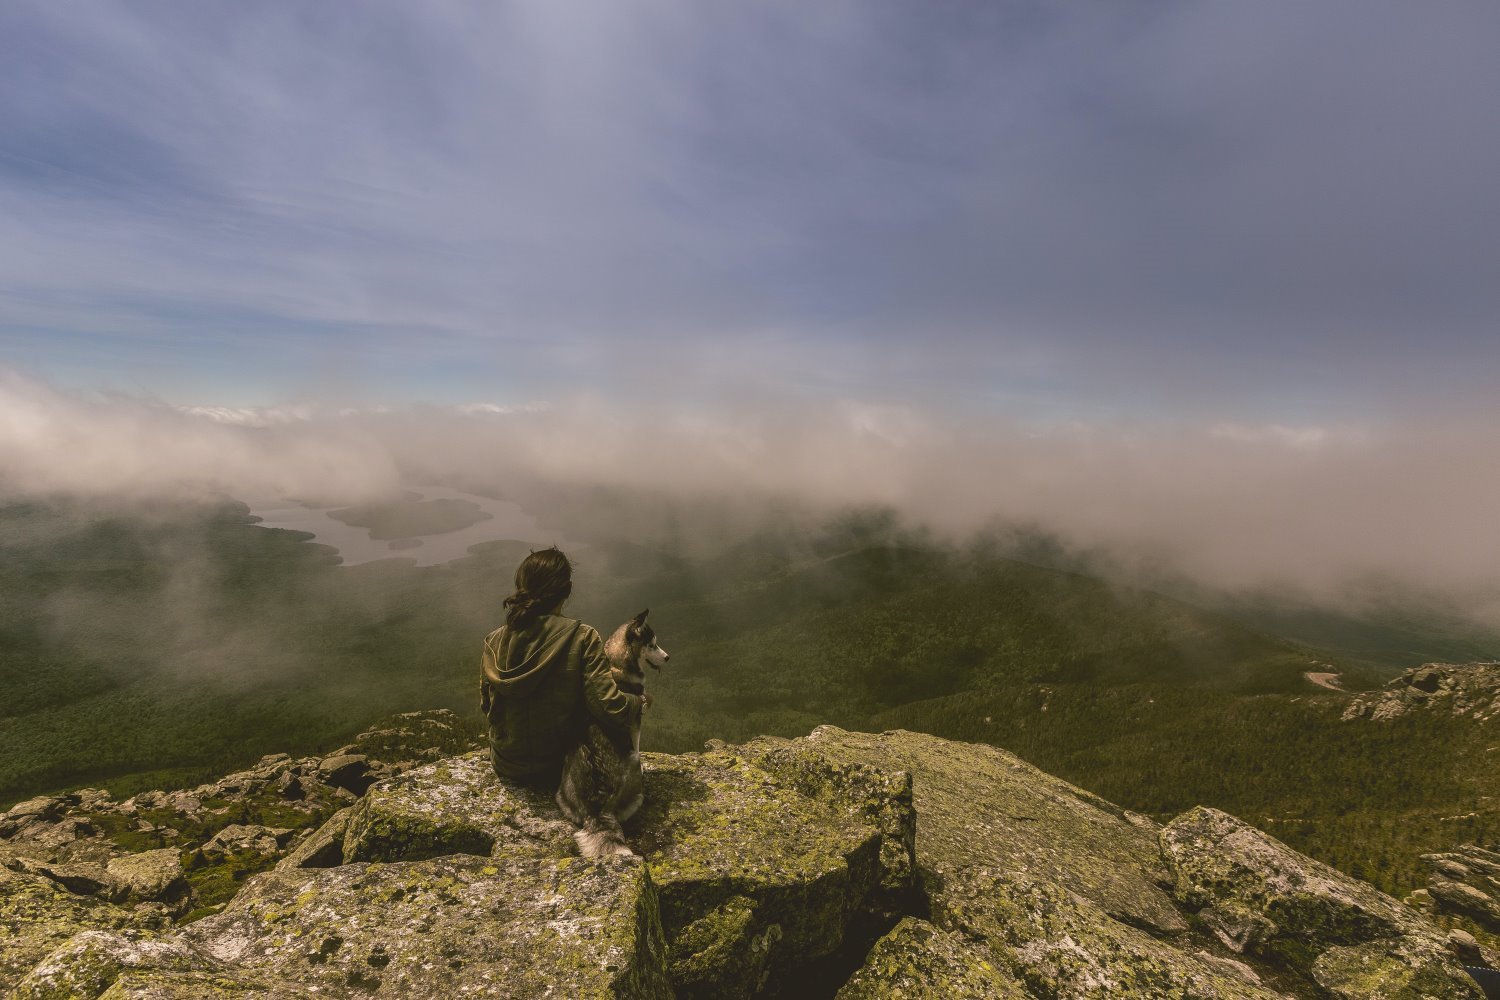
Because of the wide-angle field of view, when you look through a wide-angle lens, you’ll encounter an expansive scene. For instance, if you’re standing on a beach at sunset, a wide-angle lens will show you the setting sun, but it’ll also show you the rocks at your feet and the clouds high in the sky:
Note that the smaller the focal length (i.e., the lower the focal length millimeter number), the wider the lens and the more expansive the view. A 35mm lens is slightly wide, a 24mm lens is moderately wide, and a 10mm lens is insanely wide.
Most manufacturers sell many of the same wide-angle focal lengths. Here are a few common options:
12-24mm
24-70mm (here, the 70mm end starts to stretch into telephoto lens territory)
16-35mm
24mm
18-55mm
35mm
Wide-angle vs telephoto lenses
If you’ve spent some time browsing lenses, you’ve probably come across the terms “wide-angle” and “telephoto.” These are two ends of the spectrum in photography lenses.
As I explained above, wide-angle lenses offer you a broader field of view, extending the frame beyond what the human eye naturally sees; telephoto lenses, on the other hand, allow you to zoom in when photographing distant subjects.
A telephoto lens in action! Telephoto lenses tend to be much longer and heavier than wide-angle lenses.
Telephotos are ideal for capturing small birds and planes high above, and they can also be great for zooming in on specific parts of a landscape.
A close-up bird photo like this one requires a long telephoto lens.
But while telephoto lenses are perfect for smaller and more skittish subjects, they have serious limitations. They’re large, bulky, and very expensive, plus they’re not designed for expansive shots that include both the subject and its environment – so a tele lens will not help if you’re aiming to capture an entire seascape.
This is where wide-angle lenses have the upper hand. They allow you to capture more of the scene, making them perfect for grand vistas and wide-open spaces. So if you’re looking to go broader, not tighter, a wide-angle lens is the right buy.
Reasons to try wide-angle photography
Wide-angle lenses offer a few key benefits. First, as I emphasized above, the wider your lens, the greater the scene that you’re capable of capturing.
So if you want to capture beautiful, sweeping landscape shots that include the foreground and the background and a beautiful sky, a wide-angle lens is essential. Standard and telephoto lenses will only capture a small slice of the scene, while a wide-angle lens will show it all.
Second, wide-angle lenses help you create shots that have a deep depth of field – that is, shots that are sharp from foreground to background.
The closer you are to your subject and the longer the focal length you use, the more blurred the background will appear. Wide-angle lenses, however, use short focal lengths, which means that your main subject will turn out sharp, as will key elements in both the foreground and the background. This deep-depth-of-field look is heavily favored by landscape and architectural photographers (and can look great in portrait and street shots, too!).
Third, wide-angle lenses help exaggerate perspective. When you capture a sunset scene at, say, 16mm, the sand and water in the foreground will lookunusually close to the lens, while the horizon line will look unusually far from the lens.
Take a look at this next shot; notice how the stones look huge in comparison to the background buildings?
While this type of perspective distortion isn’t always desirable, you can use it to emphasize foreground elements and create images with lots of depth. (For those reasons, the effect is used by landscape photographers all the time!)
Wide-angle zooms vs primes
Wide-angle lenses can grouped into two categories: fixed focal length lenses, known as primes, only capture a single field of view, while multi-focal length lenses, commonly referred to as zooms, allow you to zoom in and out as required.
If you’re trying to pick a good wide-angle model but you’re not sure which lens type to choose, consider your goals and preferences.
Prime lenses are usually more affordable, so if money is tight, a prime might be your best bet. Additionally, they are compact and light, making them ideal for travelers or those who are constantly on the move. Finally, if you love creating shallow depth of field effects, a prime lens is often the better choice, given that they tend to feature wider maximum apertures than zooms.
Prime lenses tend to be small and light.
Zoom lenses, however, win in the flexibility department. Imagine going out for a day of shooting a variety of subjects: forests, beaches, street photography, portraits. With a zoom lens, you can capture it all without swapping out your gear. Convenience is the key advantage here, though you can save money in the long run because you’ll need fewer lenses to build out your wide-angle kit.
But zooms are bigger and heavier than primes, plus if you want a zoom lens with a wide maximum aperture, you’ll often pay a pretty penny. And the optics rarely measure up to prime lenses, especially not those in a similar price category.
Zoom lenses are bigger and more expensive than primes, but they certainly offer a lot of flexibility!
At the end of the day, both lens types are perfectly valid options, and there’s no right choice; it all depends on your preferences and requirements!
When should you use a wide-angle lens?
Certain situations pretty much always make for great wide-angle photography. Landscape photographers use wide-angle glass almost exclusively, as do many architectural, street, and cityscape photographers. Here’s a more detailed list of the images you can capture with a wide-angle lens:
On the other hand, if you want to create tighter, intimate shots of a single subject, wide-angle lenses are generally best avoided. Here are images that are not easily captured with wide-angle glass:
Headshots
Half-body portraits
Sports players in action
Wildlife portraits
Bird portraits
Architectural detail shots
Distant landscape detail shots
Of course, these lists aren’t exhaustive, and they’re not set in stone, either. Wildlife photographers do occasionally use wide-angle lenses to capture animal portraits, for instance – it just takes a lot of planning (and generally involves remote-controlled cameras and/or blinds). On the other hand, street photographers do occasionally use telephoto lenses to shoot wider scenes, but it requires a lot of distance (and can’t easily be done in congested, tightly packed areas).
So while you can use this section to guide your photography (and to decide whether a wide-angle lens is right for you), don’t let it restrict you. In fact, some of the best images are taken by going against the grain!
How to use a wide-angle lens: 7 quick tips
Wide-angle lenses are great, but it’s not always easy to get stunning wide shots. In this section, I offer my best tips, tricks, and techniques for working with wide-angle lenses, starting with:
1. Combine your subject and environment
A common mistake in wide-angle photography is losing sight of the big picture. It’s easy to get excessively focused on your main subject, so I recommend that you regularly remind yourself that wide-angle lenses allow you to capture a broader scene.
In other words, you don’t have to just set your frame around the main subject; you can have plenty of fun combining both the subject and its surroundings! As you shoot, pay attention to the background and other elements in your scene. Think about how you might incorporate it into your shots, and consider taking a few steps back to really emphasize the wider world.
Of course, you shouldn’t go overboard. More isn’t always better, especially because background elements can be distracting. The last thing you want is a distracting sign or stoplight taking focus away from a portrait subject! So if you do try to create more environmental images, look to enhance the overall composition without adding unnecessarily eye-catching elements.
2. Include foreground interest for added depth
Foreground interest refers to eye-catching elements in the foreground of your image – and if you can include a bit of foreground interest in your composition, it’ll look amazing. It’ll also add lots of depth, which can be a great way to make your wide-angle shots stand out.
Landscape photographers use this technique all the time. They’ll photograph a distant mountain, but they’ll add a river, a road, some flowers, or a fallen log in the foreground; that way, the viewer’s eye starts at the bottom of the frame, then slowly journeys through the scene toward the mountain in the background.
Of course, you can also use foreground interest to enhance urban landscapes, street scenes, and so much more. The sky is the limit!
So as you set up your shot, keep an eye out for these elements. Adjust your composition to include them. Try to create a journey for the viewer – so they can start in the foreground and naturally move toward the background of the scene!
3. Add leading lines
Leading lines refer to lines that lead the eye through the frame, and they’re a great way to give your photos three-dimensionality.
Leading lines generally start toward the bottom of the frame – as foreground interest – then work their way up (and back), so that they push the viewer toward the main subject.
That said, you can really position leading lines anywhere throughout the frame; for instance, an outstretched arm can lead the eye toward a car (in a street photo), or a fallen pear can lead the eye toward a basket of fruit (in a still life photo).
So train yourself to look for lines. And then, when you find a line or two, use it to guide the viewer through the frame!
4. Watch the depth of field
It’s easy to assume that everything will be in focus with a wide-angle lens. But while wide-angle glass does make it easier to maintain sharpness, depth of field still matters.
Your aperture setting and focus point play a crucial role here, especially when your composition includes elements close to the lens (see my tip on including foreground interest, above!). To ensure most or all of your scene is in focus, make sure you dial in a smaller aperture, such as f/8 and beyond.
Additionally, set your point of focus about a third of the way into the scene. This technique allows you to approximate the hyperfocal distance, which is basically a fancy way of saying that it maximizes your window of sharpness!
5. Don’t be afraid to go minimalist
Minimalistic photography features lots of negative (i.e., empty) space, such as broad expanses of sky, long stretches of untouched beach, plain white walls, and so on. The negative space occupies most of the composition, while a small portion of the image features an eye-catching subject (such as a person walking in the distance).
And wide-angle lenses are great for producing stunning minimalistic photos.
You see, the wide field of view will help you stuff your photos full of negative space. Simply find a subject, position yourself so the subject is surrounded by empty space, then zoom out to your widest focal length. The results will be gorgeous!
6. Get up close for added distortion
Most photographers try to avoid distortion in order to capture natural-looking images that closely mirror reality. But as I mentioned above, distortion isn’t always bad – and if you really lean into those distortion effects, you can produce some unique and creative shots.
Here is the basic rule of perspective distortion: The closer you get to your subject, the more you can exaggerate proportions, making nearby objects appear larger while pushing away the background. So if you put your lens close to a person’s face, their nose and lips will become large while the area behind them will seem to recede.
Of course, ultra-wide lenses may not be your first choice for a flattering portrait, but that’s not what we’re after here. The goal is to create disorienting, almost surreal scenes. Landscapes with a towering flower in the foreground or a pet’s face humorously exaggerated can spark intrigue. You can even use this technique for architectural photography, where the distortion can emphasize the intense lines of a building.
So the next time you’re out shooting, challenge the norms. Try positioning yourself close to your subject with your wide-angle lens. It’s a simple way to create stunning, unconventional images!
7. Correct perspective issues in post-processing
While distortion can be a creative tool, there certainly are times you’ll want to minimize it. When you’re photographing architecture, for instance – either interiors or exteriors – a wide-angle perspective will frequently result in converging verticals. And when shooting landscapes with trees, you may sometimes notice the trunks “leaning” to one side.
The bad news is that, in both of the above cases, the distortion can look somewhat amateurish. The good news is that correcting such issues is a straightforward process in most post-processing software. Lightroom, for instance, offers a “Transform” panel where a single click can remove perspective distortion, and you can even purchase dedicated programs that are designed specifically to handle perspective issues.
Bottom line: Before you publish or share a wide-angle image, make sure you look it over for any unwanted perspective distortion! While distortion isn’t always bad, it’s important that you use it deliberately, not accidentally.
Wide-angle lenses: final words
Wide-angle photography is certainly a lot of fun – and you can use wide-angle glass to capture gorgeous landscapes, portraits, and so much more.
Hopefully, you found this article useful, and I do encourage you to save some (or all!) of the tips I shared. That said, don’t follow them too carefully; photography is all about finding what works for you and adapting old approaches to fit your unique style.
So pick the perfect wide-angle lens. Start practicing. And have fun!
Now over to you:
What kind of wide-angle lens do you plan to buy? What kind of wide-angle photography do you want to do? Share your thoughts in the comments below!
The i7 was great! How does the more compact V3 Ultra stack up?
A little while back we reviewed the Hohem iSteady i7, a larger, feature-packed gimbal that impressed us with its stability and creative shooting modes. After publishing that review, we heard from a handful of readers asking: “What about the smaller one — the Hohem iSteady V3 Ultra?” I guess that’s a fair question if you’re carrying your camera gear, you want a gimbal that’s small and handy! This one sure is small and handy. Easily slotting into most any camera bag or a pocket in a pinch.
So yes, we got our hands on the V3 Ultra to see how it stacks up. Spoiler alert: if you’ve been looking for a compact, travel-friendly gimbal that doesn’t cut corners, you’ll be pleasantly surprised.
First Impressions
Straight out of the box, the V3 Ultra feels solid but lightweight. At just over 350g, it’s noticeably lighter than its bigger sibling, making it the kind of gear you can throw in a daypack without thinking twice. For travel, vlogging, or family adventures, that’s a huge plus.
The foldable design also makes it a natural choice for creators who don’t want their kit to take up half the carry-on space.
Setup and Ease of Use
One of Hohem’s strong points has always been user-friendly setup, and the V3 Ultra is no exception. Balancing takes seconds, and once you pair it with the Hohem Joy app, you get access to a suite of features like:
AI gesture control for hands-free shooting
Face tracking that keeps subjects in frame (great for solo shooting)
A variety of creative shooting modes like hyperlapse, timelapse, and dolly zoom
Detachable, adjustable (output and colour temp!) LED fill light
Detachable 1.22″ full-colour touchscreen remote (Works up to 30′ away)
It’s the same experience we liked on the i7 — just in a smaller package.
The Ai tracking (And as you know, I’ve mentioned before about my feelings on Ai haha) …the tracking is easily as good in my experience! Especially good for such a compact gimbal! The gesture control was concise ??
The Hohem iSteady V3 Ultra supports 360 degrees infinite pan tracking, so yes, you can literally run circles around your camera! Another example might be working on a workbench, moving around it to different tools, your camera setup in the middle, or you’re on set, shooting menu items and the Hohem iSteady V3 Ultra will stand in the middle allowing you to work all the way around the room while the camera follows you.
Performance and Stability
This is where many “compact” gimbals fall short, but the V3 Ultra holds its own. Whether walking through a busy street or chasing kids around the park, footage stayed buttery smooth and professional-looking.
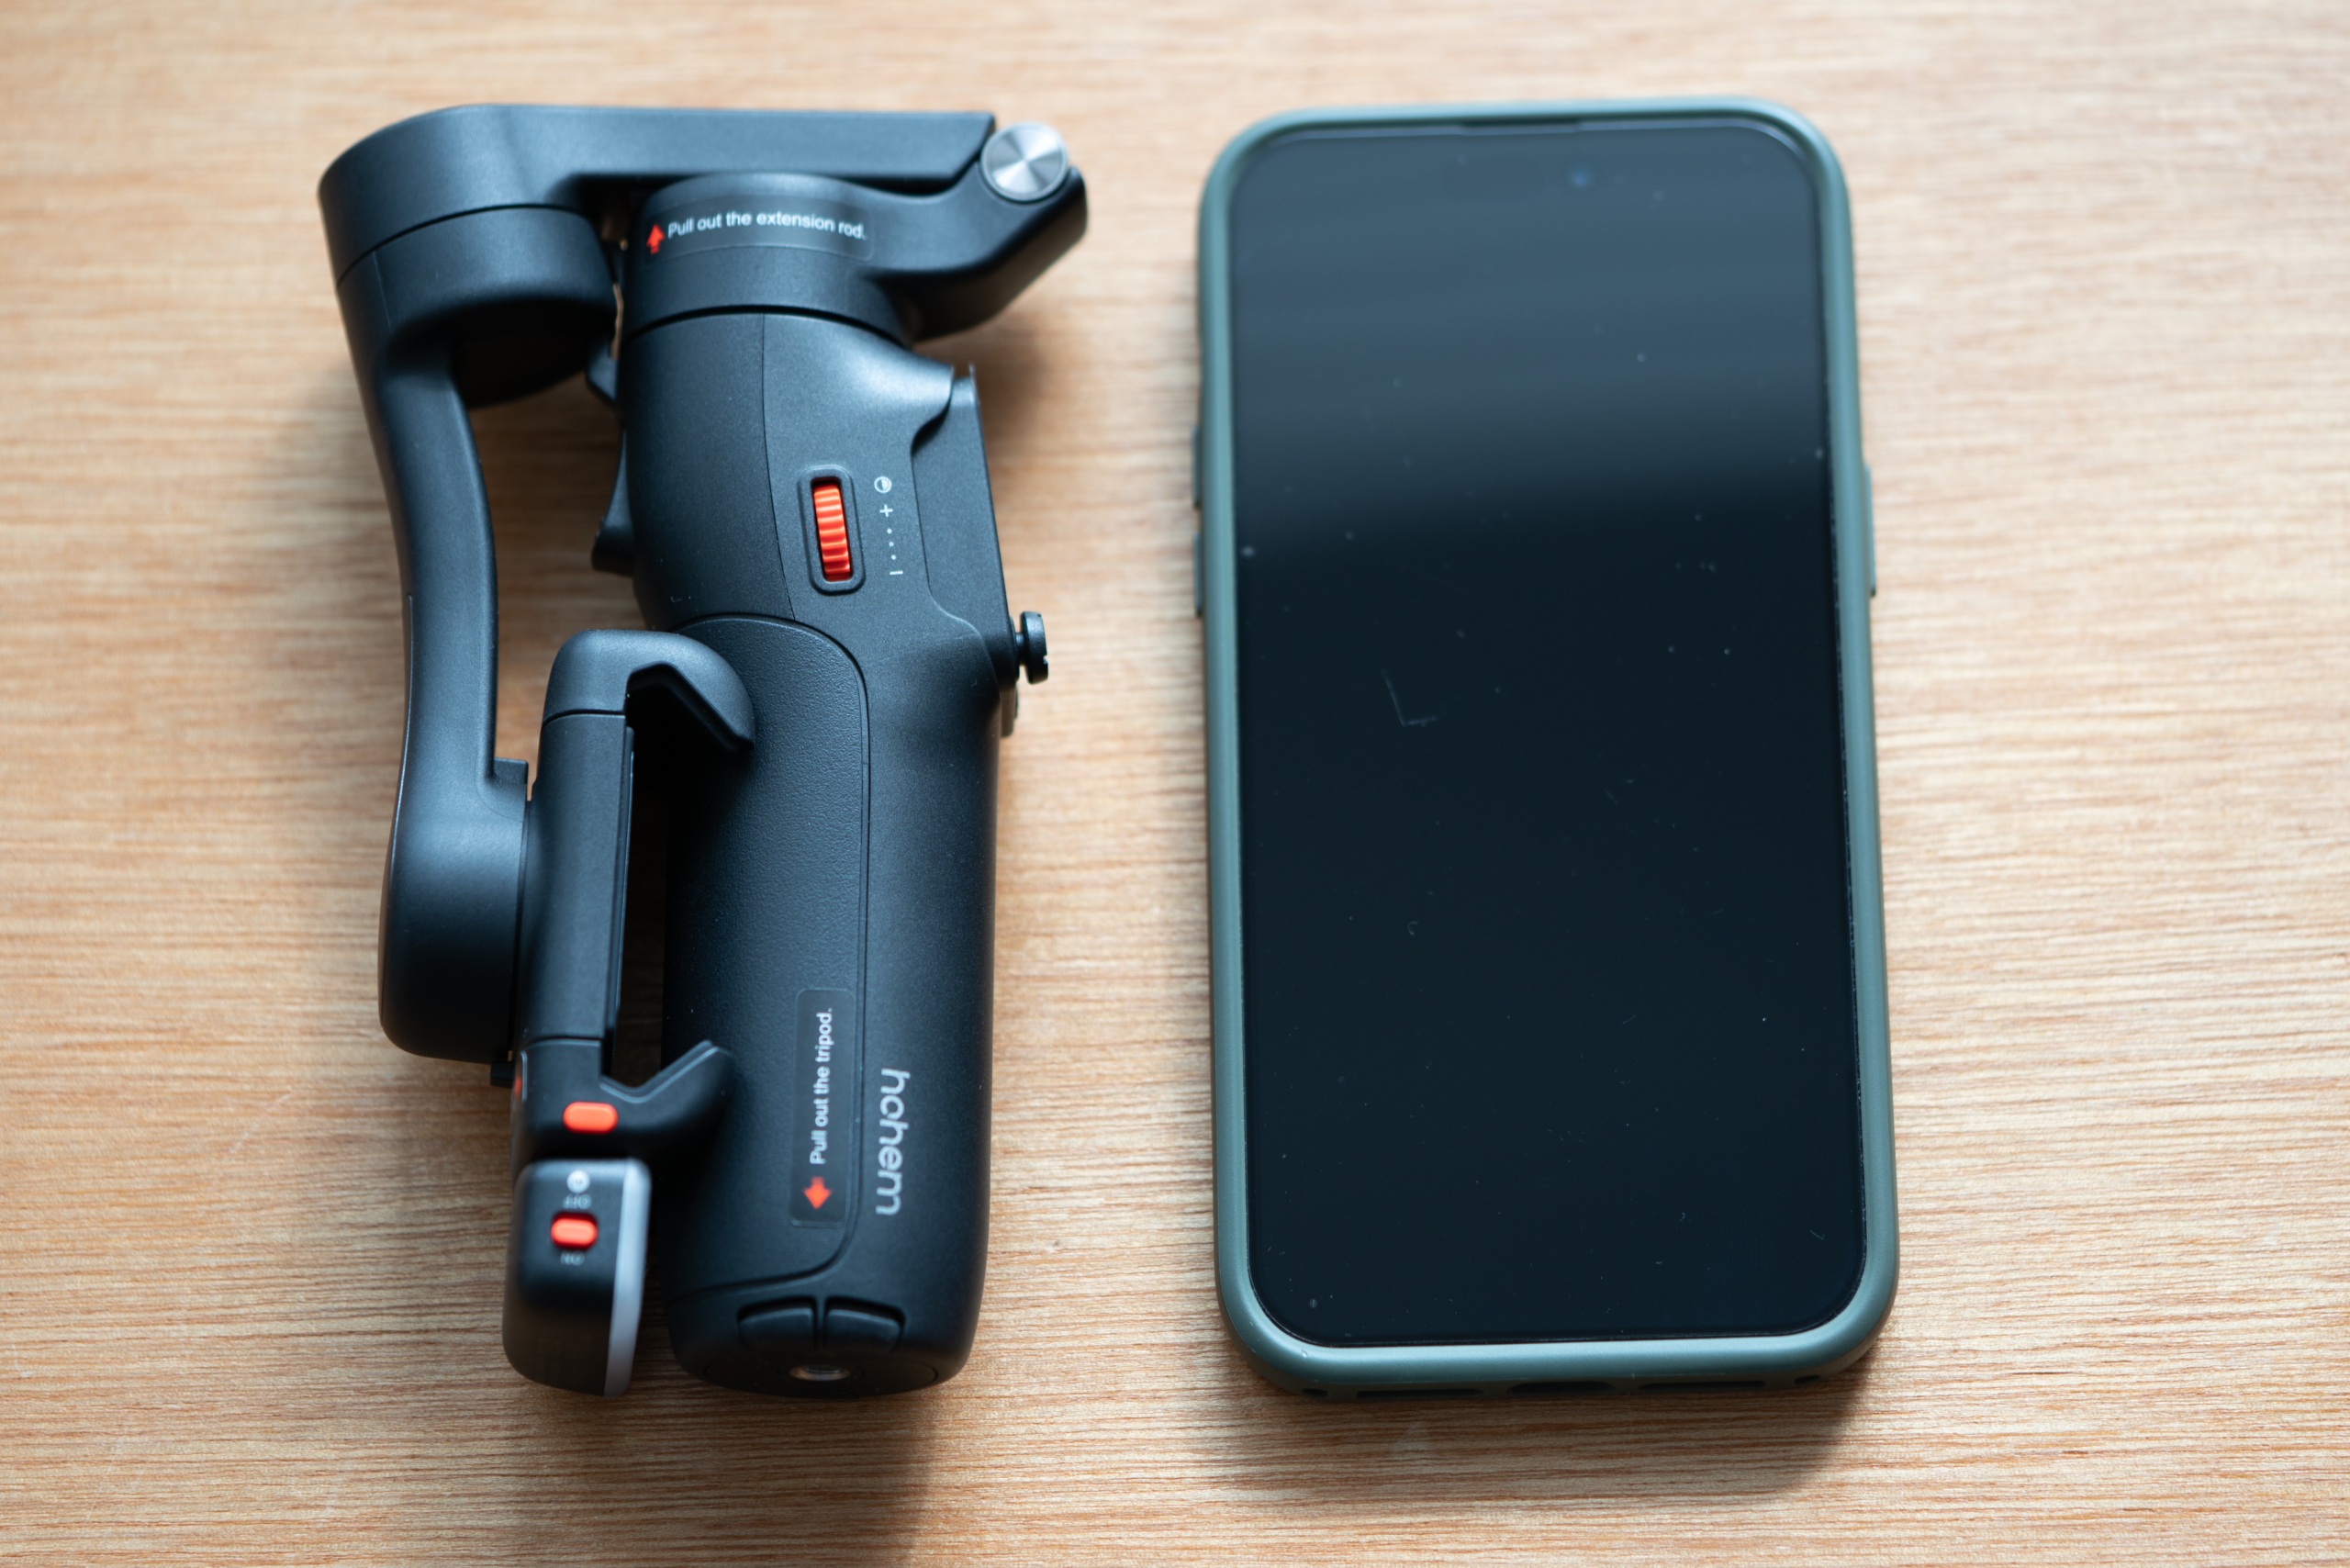
The 3-axis stabilisation is reliable, and the motors feel confident even with slightly heavier phones. If you’re using something like an iPhone 14 Pro Max (Like mine, below) or a large Android, the gimbal still manages just fine.
Interestingly, the photo above (With the little tripod that was already on my desk!) was before I realised the iSteady V3 Ultra already has a built in tripod, I didn’t realise because it was tucked tightly out of the way! Another super-convenient point on the board! ?
Battery Life
Hohem claims up to 9 hours of battery life (or 4 in Ai mode), and in our testing I’d say you would likely get pretty close to those times. For a day of filming, you’re unlikely to run flat unless you’re really pushing it. Charging is quick via USB-C, another tick in the “modern and convenient” box.
Who’s It For?
If you already own the iSteady i7 and love it, the V3 Ultra isn’t trying to replace it — it’s more like its nimble younger sibling. The i7 is perfect when you want maximum stability and creative control, while the V3 Ultra is what you’ll reach for when you’re packing light.
Travelers will appreciate the compact size.
Vloggers and solo creators will love the gesture control and tracking.
Parents and casual shooters will enjoy smooth video without needing pro-level gear.
Final Thoughts
The Hohem iSteady V3 Ultra is a reminder that small doesn’t mean limited. It delivers stability, creative shooting modes, and ease of use in a size that’s perfect for everyday carry.
If the iSteady i7 is your go-to for serious shoots, the V3 Ultra is the one you’ll happily bring everywhere else.
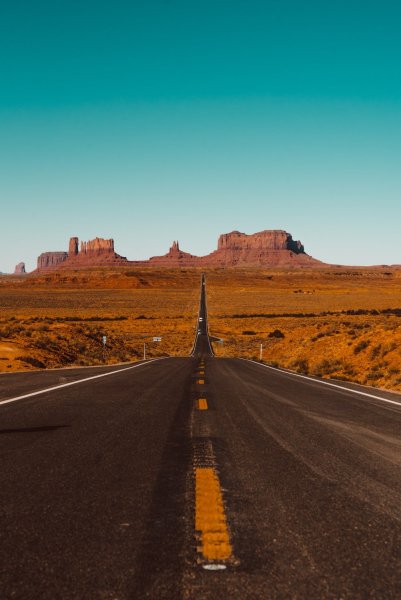
Looking back at this article, we suggest a full frame camera, and honestly, it likely is the best tool for the job, but, there’s no reason you can’t use ANY camera you have to try a bit of night sky photography, even most modern phones will allow you a slower shutter and higher ISO to capture ‘something’ – Key is keeping that camera, whatever camera it is, nice and still. The new iPhone, your Samsung Galaxy (Come on, it’s got GALAXY in the name!) …I’ve been using the phone holder from 3Leggedthing, but there are MANY out there… (Benefits I guess are that the 3LT one has an arca swiss base that allows you to put it straight on your tripod) ….so don’t let the whole full-frame thing hold you back, get out there and experiment! — Updated by me, 15 Sept, 2025. — Simon ??
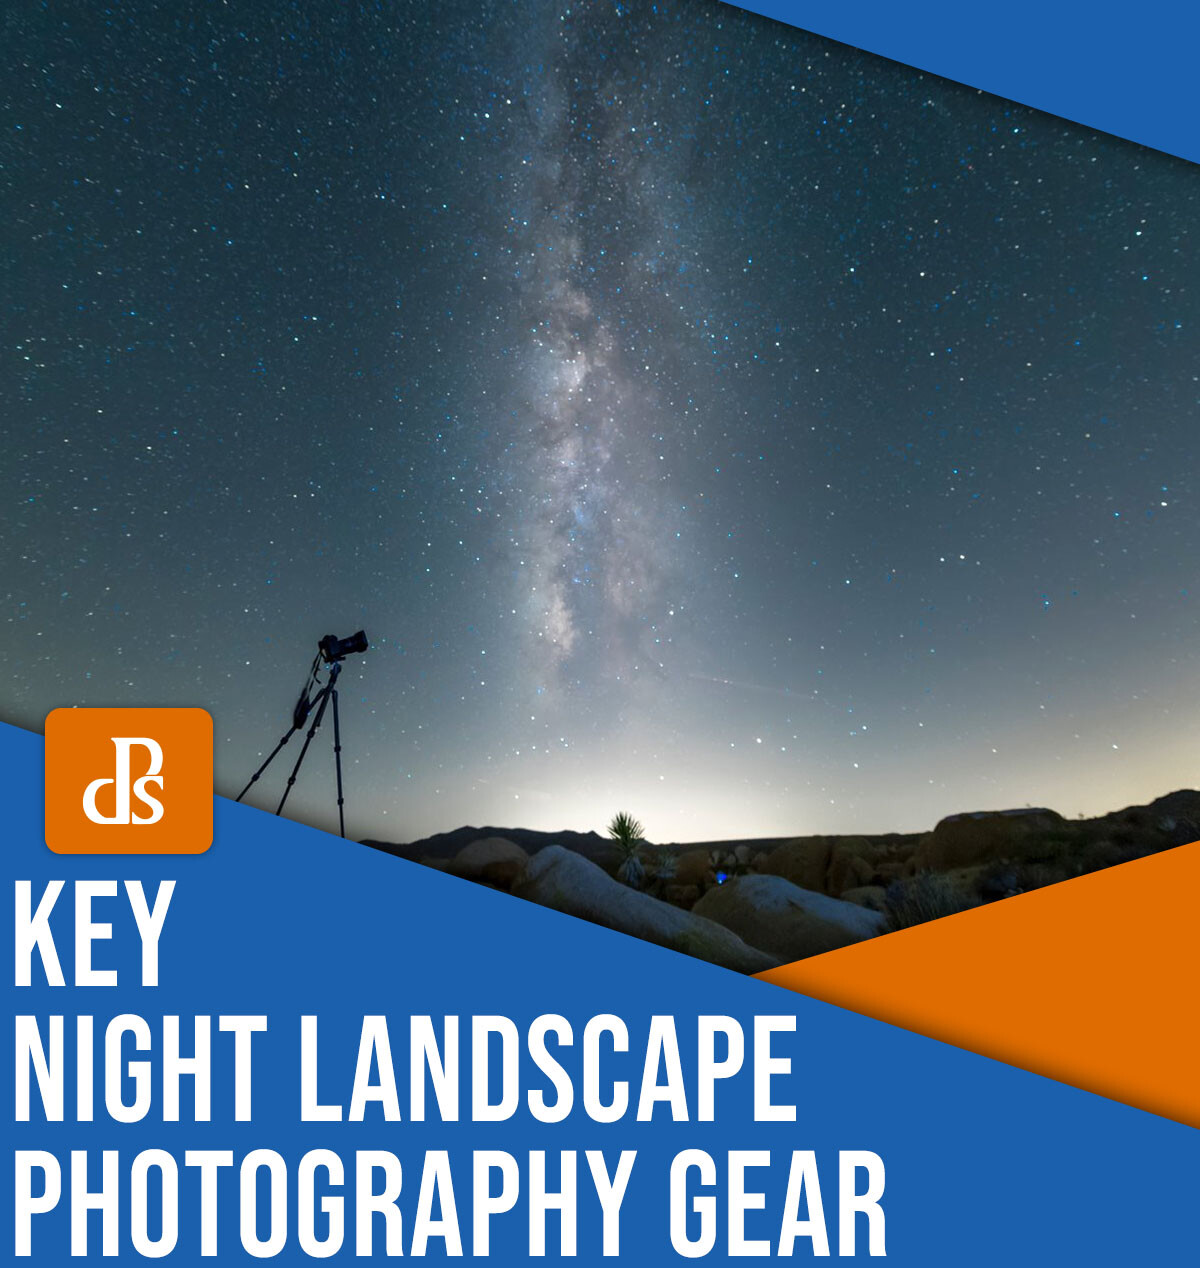
Night landscape photography is a demanding genre; you can’t just head out with a handheld camera and expect to come back with gorgeous shots. To get the best results – the kind that you can print large and hang on your wall – you need the right gear.
One way to determine essential gear for nighttime landscapes is through trial and error, but it’ll take a long time (and a lot of money) to arrive at the best setup. That’s where I can help; as an experienced landscape shooter, I can offer plenty of advice for selecting the perfect gear. And below, I share my favorite night landscape photography equipment, including the best cameras and lenses as well as key accessories such as tripods and filters.
Let’s dive right in.
1. A full-frame camera
Your camera is your most crucial tool for night landscape photography, and purchasing a capable model is essential.
You see, in the world of nightscapes, a high-quality landscape camera – especially a full-frame camera – makes all the difference. These models excel at high ISO settings, which are crucial for capturing the night sky above dimly lit terrain. And while you can get by with entry-level APS-C models, you’ll quickly notice limitations. Noise will start to creep in, and your starry sky will look more like a grainy mess.
Now, the DSLR versus mirrorless debate does come into play here. Mirrorless models are feature-rich, and features like manual focusing guides and electronic viewfinders come in handy in certain scenarios. But don’t discount DSLRs; their optical viewfinders are very effective when working in near-total darkness. Ultimately, both have their merits, and it comes down to what you’re most comfortable using. Just remember that it’s crucial to go full-frame for the best high-ISO performance.
2. A wide-angle lens
Lenses are the eyes of your camera, and in the domain of nighttime landscapes, you’ll want those eyes to be wide open. Typically, wide and ultra-wide lenses are your best bet for capturing the grandeur of the night sky with plenty of interesting foreground. A lens like a 14-24mm zoom will include more of the scene for awe-inducing compositions, though such lenses do generally come with a hefty price tag.
If your budget is tight, don’t count yourself out. You can go for a 17-40mm zoom or even a 24mm prime lens, both of which will offer reasonably wide fields of view.
One final tip: Keep an eye out for lenses with large maximum apertures, like f/2.8. A large aperture is your best friend in low-light situations; it allows more light to hit the sensor, resulting in vibrant, crisp shots with stars that look sharp.
3. A sturdy tripod
If you’ve dabbled in any kind of landscape photography and you don’t already own a solid tripod, I highly recommend you purchase one right away. This is especially true if you want to photograph at night – shooting at night usually means using slower shutter speeds to let in more light, and without a tripod, you risk capturing blurry photos.
In other words, a good tripod will make a world of difference in your night landscapes.
Carbon fiber tripods are generally the way to go. They’re lightweight and tend to be extremely sturdy, though they can be pricey. Don’t feel you need to purchase the best of the best, as a middle-of-the-road, solid tripod won’t break the bank and can still deliver dependable results.
On the other hand, resist the urge to snag a budget tripod. They may seem cost-effective, but they often break and won’t always net you sharp images, which will cost more in the long run.
4. A remote shutter release
So you’ve set up your camera perfectly, dialed in the settings, and you’re ready for the shot. You press the shutter button, expecting to capture a great image – but when you review the shot, it looks blurry. Why? Because your camera moved when you touched it.
That’s where a remote shutter release comes into play. This nifty gadget allows you to take photos without touching your camera, eliminating any chance of camera shake so you can capture tack-sharp shots time and time again.
If you’re keen on star trails or long exposures beyond 30 seconds, it’s important to recognize that some advanced remotes display the exposure time; that way, you can carefully determine the length of the exposure as you work.
But what if you don’t plan to use extra-long shutter speeds? Using your camera’s built-in two-second timer can also prevent vibrations from pressing the shutter, but it’s not the most convenient way to shoot, and you might find a remote release to be a valuable addition to your gear bag.
4. A natural night filter
Photographers don’t talk much about using a natural night filter, but let me tell you, this tool can be a game-changer. Especially when shooting near cities or populated areas where light pollution is a big issue, a natural night filter becomes a go-to item in my kit. It slots easily into a filter holder on the front of your lens, and once in place, it acts as a barrier, filtering out the wavelengths of light pollution that mess up your photos.
Sure, you can try to fix light pollution issues in post-production. But in my experience, the right filter can save you a lot of hassle – your images will come out crisper and more balanced right off the bat. NiSi and LEE are great brands for night filters, and they both offer robust and effective options. The filters aren’t exactly budget-friendly, but if you’re serious about capturing the night sky in all its glory, investing in one can be worth every penny.
5. Plenty of batteries
It’s every photographer’s nightmare: You get all geared up, find the perfect spot, set up your tripod, take a few shots, and then – oh no! – the battery dies. Long exposures and cold nighttime temperatures can deplete your batteries faster than you think, and that’s why having extra batteries is non-negotiable when you’re out in the field at night.
In a perfect world, we’d all carry a handful of brand-name batteries from Canon, Nikon, or Sony. But let’s face it, extra batteries are expensive – so if you’re looking to save a bit, there are third-party batteries that cost less. Just read the reviews, and understand that they might not have the same longevity or reliability as the name-brand ones.
You can also adopt a few tricks to save battery life. Turn on your camera’s power-saving mode, avoid using the electronic viewfinder, and only power up your camera when you’re ready to shoot.
But my basic advice? Keep two or three fully charged batteries in an inner pocket of your jacket, especially if it’s cold. That way, you’re always prepared, and you won’t have to cut your photography session short because of a dead battery.
6. A powerful headlamp
Shooting at night is, well, dark. You’re out in the field with a bag full of equipment, but none of it will be useful if you can’t see what you’re doing.
A handheld flashlight might come to mind as a solution. However, using one can be limiting. If you’re maneuvering over uneven ground, your hands are better off free, and that’s where a headlamp becomes invaluable. Strap it on, and suddenly you have light exactly where you’re looking, no juggling act required.
Plus, with a headlamp, you can see clearly as you mount your camera, select focus, adjust composition, or change settings. But don’t forget to turn off the headlamp before you hit the shutter. Otherwise, you’ll end up unintentionally painting your scene with light.
7. A smartphone
Your smartphone is a lot more than just a device for calls and texts; when you’re out capturing the beauty of the night, it becomes an incredibly useful tool.
First off, your phone can help you navigate. GPS and mapping apps can guide you to the perfect location for your shoot. It’s crucial to be able to find your way, especially when you’re shooting in remote areas.
Plus, in the unfortunate event you find yourself in a tight spot, your phone is your lifeline. Of course, make sure you’re within a signal range if you’re relying on it for emergencies.
Finally, your phone can be an all-in-one photography assistant. There are various apps available that can enhance your nighttime photography game. I’m talking about depth-of-field calculators and apps that show you the position of the sun, the moon, and the stars. Whether you’re planning your next outing or adjusting your settings on the fly, these tools can be invaluable.
Night landscape photography gear: final words
And there you have it: my go-to list for nighttime landscape photography equipment. From powerful full-frame cameras and wide-angle lenses to sturdy tripods and remote releases, each piece of gear plays a crucial role.
But it doesn’t end there. The more nuanced pieces of equipment like natural night filters, headlamps, and even your smartphone can make the difference between a good photograph and an extraordinary one!
You’re now ready to head out and capture the magnificence of the night sky. So pack your gear, and don’t forget the spare batteries. The night is waiting, and so are countless opportunities to take truly awe-inspiring photographs!
Now over to you:
What equipment do you plan to purchase for your night landscape photo kit? Share your thoughts in the comments below!
If you’ve ever wrestled with a camera strap that digs into your shoulder, twists at the worst moment, or just feels like it was designed for someone else’s body, 3 Legged Thing’s new Axis Strap System promises a rethink.
We’ve had the Axis Sling and the Axis 34 for a little over a week now, and they’ve already been put through their paces. I shot two halves of a soccer match and then wrangled a team portrait for 32 people (an annual tradition that’s always a lot of fun!).
During the game, I ran the Axis Sling with my Sony a7Rmk3 and Tamron 150-500mm, The sling’s QD attached to a QD plate on my lens’ foot. When it came time to line everyone up for the big team photo, I switched out to the Axis 34. Worn cross-body with the camera off to one side, Easily adjusting the strap up tighter to my body with the handy ‘easy-pull lever’ made moving around much easier. The QD buckle attachment feels so solid, I was confident it wasn’t going anywhere from that first click. Kicking goals!
What really stands out for me is being able to swap where the strap connects. With the rock-solid QD buckle, I can clip straight into my L-bracket or a QD Arca Swiss compatible quick release plate — a true gamechanger. It’s a word that gets thrown around a lot, but this time I feel like it genuinely applies.
Using the Arnie dedicated QD L-bracket on my camera and a QD arca swiss plate on the foot of my lens, I could use either connection points and have my camera hang at my side pretty much however I wanted, making it very easy to grab my camera and bring it up for a photo.
The Axis 34 has gained a regular slot in my camera bag – as someone who has used pretty much every style of camera strap available, I think the new Axis range from 3 Legged Thing is about as close to perfect, for me, as it gets.
Ain’t no model!?
Here’s what they say
British camera-support manufacturer 3 Legged Thing is bringing its trademark innovation and engineering expertise to the world of carry solutions with the launch of the Axis Strap System, debuting today on Kickstarter.
At the heart of Axis are two game-changing components: the beautifully unique 4-Axis QD Buckle and 3LT’s own take on an essential piece of hardware — the QD Swivel. Originally developed for astronautics, military and law-enforcement gear — even trusted by NASA for tethering cargo — this ultra-secure quick-detach system has been re-engineered by 3 Legged Thing to keep cameras safe, accessible and ready for action.
We designed the world’s first four-axis QD buckle — which means you can actually adjust how your strap fits and moves. All body shapes are different, so why should photographers settle for anything less than a tailored fit? Switch which socket you plug into to seamlessly contour the strap around your natural curves. Got a six-pack? Good for you. Working on a keg? Time to celebrate. Muffin top? We’ll make it fit. Moobs? Now you can style it out. ?
Made in Great Britain – Creating Local Jobs
Axis straps are proudly designed, engineered and manufactured in Great Britain, meeting one of the world’s most respected engineering standards. To support this launch, 3 Legged Thing has invested in a new UK-based sewing facility, creating local jobs and ensuring the entire range is built to the highest standards of craftsmanship. For photographers, that means world-class design, built in the shires of middle England, with a distinctly British stamp of quality.
A Strap System Like No Other
The Axis range covers every style of carry:
Axis Pulse – a compact, rock-solid wrist strap
Axis 24 / 34 / 44 – sleek, supportive straps in three widths to match any camera, from small mirrorless to heavy pro rigs
Axis Sling & Twin Sling – breathable cross-body comfort, with a dual-camera option that converts back to a single in seconds
Axis Anywhere & Gatekeeper – clever bag-mounting solutions that take the weight off your neck and shoulders
QD4 & QD7 Plates – Arca-Swiss compatible quick-release plates with integrated QD sockets, built for seamless connection
Engineering Meets Comfort
Axis isn’t just about the connection. Every strap has been designed from the ground up, incorporating features for your comfort:
Cam Lever Lock adjusters that actually stay locked
Neck and shoulder padding that eases irritation and increases airflow
Hypalon-reinforced stitching for durability
Optional padded linings for those long days of shooting
Founder’s Quote
“This project has been eight years in the making, though massively interrupted by the pandemic, so we’re incredibly excited to bring the Axis Strap System to market. I genuinely believe that QD is the future of camera-carrying solutions, and we will be bringing this technology to many more products in the future. We’re also delighted that we’re creating a production facility in the UK for these straps, so they can proudly carry the ‘Made in Great Britain’ mark.” — Danny Lenihan, Founder & CEO, 3 Legged Thing
Kickstarter Launch
The Axis Kickstarter campaign runs for 31 days from 9 September 2025. Backers can expect substantial discounts across the range, with the biggest savings reserved for early adopters.
Final thoughts from us after a week of use – I put the Axis straps through a soccer match and a 32-person team photo, and the QD buckle system stood out straight away — solid, versatile, and a real gamechanger! A pleasure to use.


 , you can tweak settings and customise functions straight from your smartphone or computer — a nice touch if you like fine-tuning your gear.